> ## Documentation Index
> Fetch the complete documentation index at: https://docs.ditto.live/llms.txt
> Use this file to discover all available pages before exploring further.
# DittoSwiftTools
> DittoSwiftTools are diagnostic tools for Ditto. You can view connected peers, export debug logs, browse collections (documents), and monitor Ditto's disk usage.
For the source code, see the GitHub > getditto > DittoSwiftTools repository.
## Requirements
* iOS 15.0+
* Swift 5.0+
## Installation
The recommended approach to using DittoSwiftTools in your project is using the Swift Package Manager.
With your project open in Xcode go to File -> Add Packages, then search using "github.com/getditto/DittoSwiftTools" to find the DittoSwiftTools package.
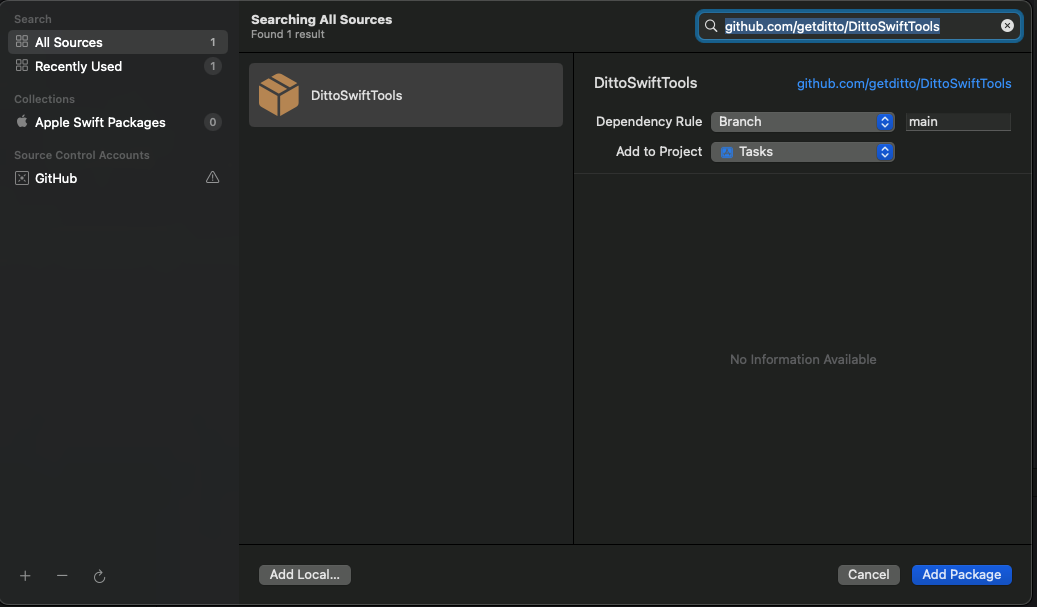 Select "Add Package"
Select which DittoSwiftTools products you would like, then select "Add Package"
If you are looking for compatibility with Ditto v4, please target the v4 branch in the Swift Package Manager.
## Usage
There are four targets in this package: Presence Viewer, Data Browser, Export Logs, Disk Usage.
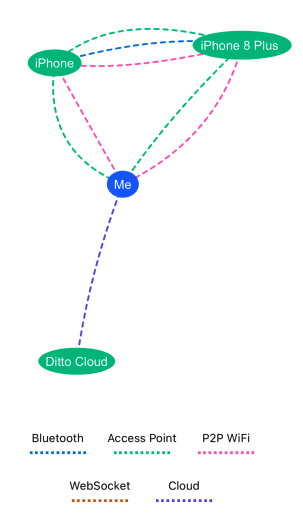
The Presence Viewer displays a mesh graph that allows you to see all connected peers within the mesh and the transport that each peer is using to make a connection.
Select "Add Package"
Select which DittoSwiftTools products you would like, then select "Add Package"
If you are looking for compatibility with Ditto v4, please target the v4 branch in the Swift Package Manager.
## Usage
There are four targets in this package: Presence Viewer, Data Browser, Export Logs, Disk Usage.
The Presence Viewer displays a mesh graph that allows you to see all connected peers within the mesh and the transport that each peer is using to make a connection.
 First, make sure the `DittoPresenceViewer` was added to your Target. Then, use `import DittoPresenceViewer` to import the `PresenceViewer`.
You can use the Presence Viewer in SiwftUI or UIKit.
**SwiftUI**
Use `PresenceView(ditto: Ditto)` and pass in your Ditto instance to display the mesh graph.
```swift Swift theme={null}
import DittoPresenceViewer
struct PresenceViewer: View{
var body: some View {
PresenceView(ditto: DittoManager.shared.ditto)
}
}
```
**UIKit**
Call `present`, pass the following as a parameter, and then set `animated` to `true`:
`DittoPresenceView(ditto:DittoManager.shared.ditto).viewController`
```swift Swift theme={null}
func tableView(_ tableView: UITableView, didSelectRowAt indexPath: IndexPath) {
present(DittoPresenceView(ditto: DittoManager.shared.ditto).viewController, animated: true) {
if let selected = tableView.indexPathForSelectedRow {
tableView.deselectRow(at: selected, animated: true)
}
}
}
```
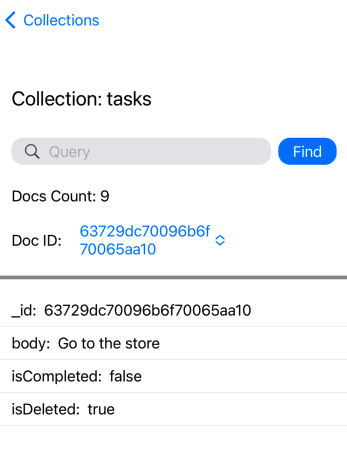
The Ditto Data Browser allows you to view all your documents within each collection, including each document's fields. With the Data Browser, you can observe any changes that are made to your collections and documents in realtime.
First, make sure the `DittoPresenceViewer` was added to your Target. Then, use `import DittoPresenceViewer` to import the `PresenceViewer`.
You can use the Presence Viewer in SiwftUI or UIKit.
**SwiftUI**
Use `PresenceView(ditto: Ditto)` and pass in your Ditto instance to display the mesh graph.
```swift Swift theme={null}
import DittoPresenceViewer
struct PresenceViewer: View{
var body: some View {
PresenceView(ditto: DittoManager.shared.ditto)
}
}
```
**UIKit**
Call `present`, pass the following as a parameter, and then set `animated` to `true`:
`DittoPresenceView(ditto:DittoManager.shared.ditto).viewController`
```swift Swift theme={null}
func tableView(_ tableView: UITableView, didSelectRowAt indexPath: IndexPath) {
present(DittoPresenceView(ditto: DittoManager.shared.ditto).viewController, animated: true) {
if let selected = tableView.indexPathForSelectedRow {
tableView.deselectRow(at: selected, animated: true)
}
}
}
```
The Ditto Data Browser allows you to view all your documents within each collection, including each document's fields. With the Data Browser, you can observe any changes that are made to your collections and documents in realtime.
 **Standalone App**
If you are using the Data Browser as a standalone app, there is a button, `Start Subscriptions`, you must press in order to start syncing data.
If you are embedding the Data Browser into another application then you do not need to press `Start Subscriptions` as you should already have your subscriptions running.
First, make sure the "DittoDataBrowser" was added to your Target. Then, use `import DittoDataBrowser` to import the Data Browser.
**SwiftUI**
Use `DataBrowser(ditto: Ditto)` and pass in your Ditto instance to display the Data Browser.
```swift Swift theme={null}
import DittoDataBrowser
struct DataBrowserView: View {
var body: some View {
DataBrowser(ditto: DittoManager.shared.ditto)
}
}
```
**UIKit**
Pass `DataBrowser(ditto: Ditto)` to a UIHostingController which will return a view controller that you can use to present.
```swift Swift theme={null}
let vc = UIHostingController(rootView: DataBrowser(ditto: DittoManager.shared.ditto))
present(vc, animated: true)
```
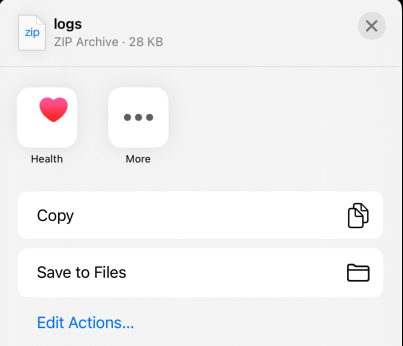
Export Logs allows you to export a file of the logs from your app.
**Standalone App**
If you are using the Data Browser as a standalone app, there is a button, `Start Subscriptions`, you must press in order to start syncing data.
If you are embedding the Data Browser into another application then you do not need to press `Start Subscriptions` as you should already have your subscriptions running.
First, make sure the "DittoDataBrowser" was added to your Target. Then, use `import DittoDataBrowser` to import the Data Browser.
**SwiftUI**
Use `DataBrowser(ditto: Ditto)` and pass in your Ditto instance to display the Data Browser.
```swift Swift theme={null}
import DittoDataBrowser
struct DataBrowserView: View {
var body: some View {
DataBrowser(ditto: DittoManager.shared.ditto)
}
}
```
**UIKit**
Pass `DataBrowser(ditto: Ditto)` to a UIHostingController which will return a view controller that you can use to present.
```swift Swift theme={null}
let vc = UIHostingController(rootView: DataBrowser(ditto: DittoManager.shared.ditto))
present(vc, animated: true)
```
Export Logs allows you to export a file of the logs from your app.
 First, make sure the "DittoExportLogs" was added to your Target. Then, use `import DittoExportLogs` to import the export logs.
**SwiftUI**
Use `ExportLogs()` to export the logs. It is recommended to call `ExportLogs` from within a sheet.
```swift Swift theme={null}
.sheet(isPresented: $exportLogs) {
ExportLogs()
}
```
**UIKit**
Pass `ExportLogs()` to a UIHostingController which will return a view controller that you can use to present.
```swift Swift theme={null}
let vc = UIHostingController(rootView: ExportLogs())
present(vc, animated: true)
```
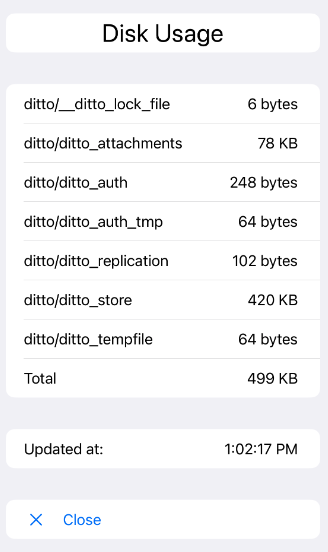
Disk Usage allows you to see Ditto's file space usage.
First, make sure the "DittoExportLogs" was added to your Target. Then, use `import DittoExportLogs` to import the export logs.
**SwiftUI**
Use `ExportLogs()` to export the logs. It is recommended to call `ExportLogs` from within a sheet.
```swift Swift theme={null}
.sheet(isPresented: $exportLogs) {
ExportLogs()
}
```
**UIKit**
Pass `ExportLogs()` to a UIHostingController which will return a view controller that you can use to present.
```swift Swift theme={null}
let vc = UIHostingController(rootView: ExportLogs())
present(vc, animated: true)
```
Disk Usage allows you to see Ditto's file space usage.
 First, make sure the "DittoDiskUsage" was added to your Target. Then, use `import DittoDiskUsage` to import the Disk Usage.
**SwiftUI**
Use `DittoDiskUsageView(ditto: Ditto)` and pass in your Ditto instance.
```swift Swift theme={null}
import DittoDiskUsage
struct DiskUsageViewer: View {
var body: some View {
DittoDiskUsageView(ditto: DittoManager.shared.ditto)
}
}
```
**UIKit**
Pass `DittoDiskUsageView(ditto: Ditto)` to a UIHostingController which will return a view controller that you can use to present.
```swift Swift theme={null}
let vc = UIHostingController(rootView: DittoDiskUsageView(ditto: DittoManager.shared.ditto))
present(vc, animated: true)
```
First, make sure the "DittoDiskUsage" was added to your Target. Then, use `import DittoDiskUsage` to import the Disk Usage.
First, make sure the "DittoDiskUsage" was added to your Target. Then, use `import DittoDiskUsage` to import the Disk Usage.
**SwiftUI**
Use `DittoDiskUsageView(ditto: Ditto)` and pass in your Ditto instance.
```swift Swift theme={null}
import DittoDiskUsage
struct DiskUsageViewer: View {
var body: some View {
DittoDiskUsageView(ditto: DittoManager.shared.ditto)
}
}
```
**UIKit**
Pass `DittoDiskUsageView(ditto: Ditto)` to a UIHostingController which will return a view controller that you can use to present.
```swift Swift theme={null}
let vc = UIHostingController(rootView: DittoDiskUsageView(ditto: DittoManager.shared.ditto))
present(vc, animated: true)
```