> ## Documentation Index
> Fetch the complete documentation index at: https://docs.ditto.live/llms.txt
> Use this file to discover all available pages before exploring further.
# Auth and Parameters
> The HTTP API is protected by an API key, passed in as an Authorization header. A number of other parameters are also permitted for each request.
## API Key
Access to the Ditto HTTP API is controlled through an `Authorization: Bearer
HTTP` header. To authenticate and gain access to Ditto Server, use a static API
key.
Accessible from the portal, the API key is a straightforward implementation for
authenticating your data product's digital identity with Ditto Server for
authorization.
The API key is a broad, long-lived HTTP API key that, once generated, remains
valid for a maximum of one year.
### Security Overview
Ditto implements strong security practices for generating and handling API keys.
* The API key is made up of a combination of random and fixed elements:
* Randomly-generated prefix
* Fixed prefix
* Randomly-generated suffix
* Once received, Ditto Server performs a hashing process on the suffix element before securely storing the API key.
### Creating and Saving API Keys
To generate and retrieve the API key you'll include in your request header, from the portal, do the following:
You need elevated access permissions to create and save API keys. You can
perform this action only if your assigned role has the **Access API keys**
setting enabled in the portal under **Settings** > **Roles**. (See [Role-Based
Access Control](/cloud/portal/role-based-access-control))
Log in to the portal > click **Apps** > and then select your app from the list.
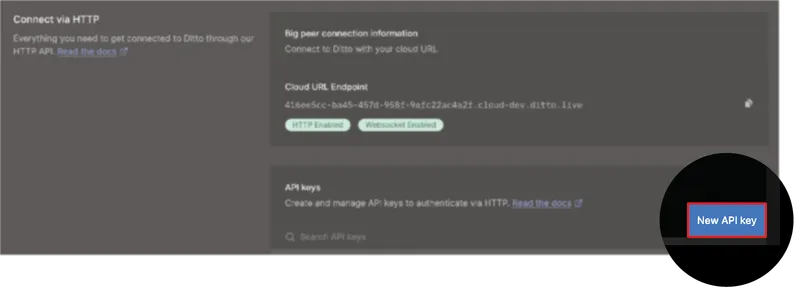
Click **Auth**, and then click **New API key** from the lower right corner.
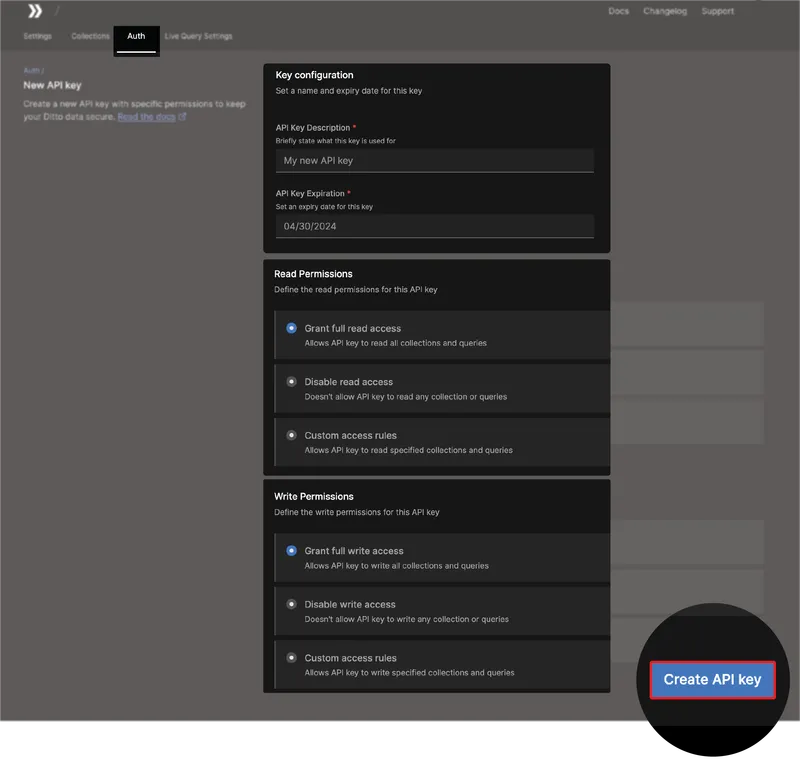
 Complete the **Key configuration** form:
1. For **API Key Description**, enter a description of the key's intended use.
2. For **API Key Expiration**, if you want to adjust the default date that appears, click the date and then select the date you want from the calendar picker.
3. For **Read Permissions**, select the option you want to set for read permissions.
4. For **Write Permissions**, select the option you want to set for write permissions.
For more information about custom access rules, see [Setting Up Custom Permissions](#setting-up-custom-permissions), as follows.
Click **Create API Key**.
Complete the **Key configuration** form:
1. For **API Key Description**, enter a description of the key's intended use.
2. For **API Key Expiration**, if you want to adjust the default date that appears, click the date and then select the date you want from the calendar picker.
3. For **Read Permissions**, select the option you want to set for read permissions.
4. For **Write Permissions**, select the option you want to set for write permissions.
For more information about custom access rules, see [Setting Up Custom Permissions](#setting-up-custom-permissions), as follows.
Click **Create API Key**.
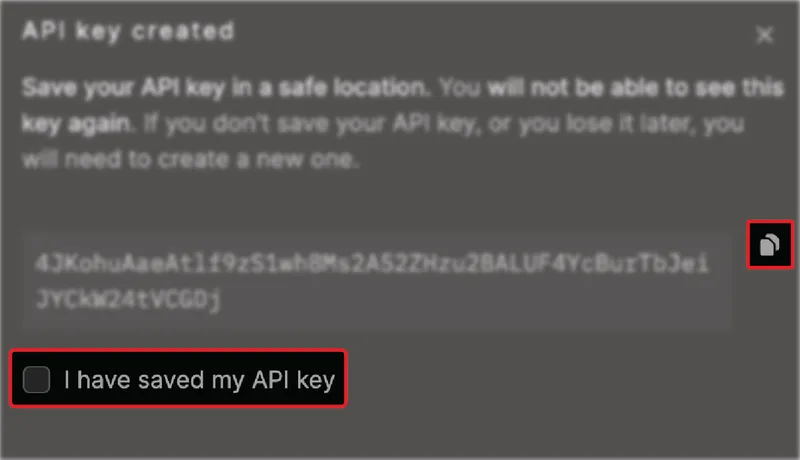
 From the \*\*API key created \*\*dialog box:
1. Copy your API key and save it in a safe location.
2. Once saved, click **I have saved my API key**, and then click **Done**.
From the \*\*API key created \*\*dialog box:
1. Copy your API key and save it in a safe location.
2. Once saved, click **I have saved my API key**, and then click **Done**.
 #### Setting Up Custom Permissions
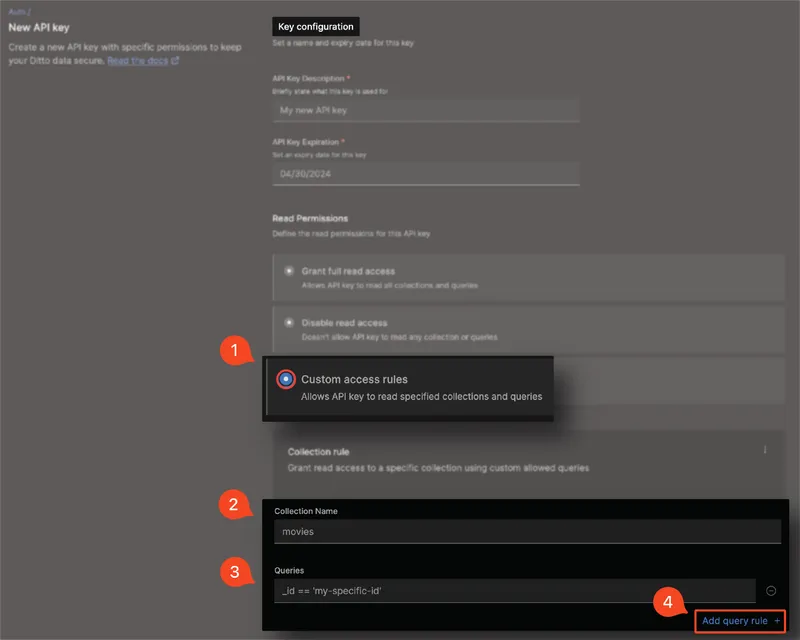
If you want to scope access to a particular collections or document IDs, set up custom access rules for \*\*Read Permissions \*\*or **Write Permissions**:
Select **Custom access rules** for the operation type you want to set up.
To scope by collection, enter the **Collection Name**.
To scope by a specific document, from **Queries**, enter your query expression.
Currently, you can only set permission queries on the `_id` field; however, Ditto is actively developing a solution for setting queries by mutable fields.
If invoking the `FindByID` method, instead of using `_id`, pass the document ID as `id`.
To add an additional rule, click **Add query rule** and then repeat step 2 and 3.
#### Setting Up Custom Permissions
If you want to scope access to a particular collections or document IDs, set up custom access rules for \*\*Read Permissions \*\*or **Write Permissions**:
Select **Custom access rules** for the operation type you want to set up.
To scope by collection, enter the **Collection Name**.
To scope by a specific document, from **Queries**, enter your query expression.
Currently, you can only set permission queries on the `_id` field; however, Ditto is actively developing a solution for setting queries by mutable fields.
If invoking the `FindByID` method, instead of using `_id`, pass the document ID as `id`.
To add an additional rule, click **Add query rule** and then repeat step 2 and 3.
 ### Including the API Key
Once you've retrieved your API key, you can make requests to Ditto Server by including your key in the `Authorization: Bearer` HTTP header of each of your requests, as demonstrated in the following `POST` request (replace `{YOUR_CLOUD_URL_ENDPOINT}` with your Cloud URL Endpoint from the portal—see [Getting your Cloud URL Endpoint](/cloud/http-api/getting-started#getting-your-cloud-url-endpoint)):
```bash cURL theme={null}
curl -X POST 'https://{YOUR_CLOUD_URL_ENDPOINT}/api/v5/store/execute' \
-H 'Authorization: Bearer {YOUR_API_KEY}' \
-H 'Content-Type: application/json' \
-d '{
"statement": "INSERT INTO people DOCUMENTS (:person)",
"args": {
"person": {
"name": "Susan",
"age": 31
}
}
}'
```
For more DQL query examples, see [Execute a DQL query](/cloud/http-api/api/post-storeexecute).
## JWT Token (HTTP API Access)
In addition to API key authentication, Ditto supports JWT tokens generated by your app’s configured Auth Webhook provider for HTTP API access.\
Use this method if your integration uses an identity provider or requires session-based authentication.
### Endpoint
```
POST /_ditto/auth/http_login
```
### Headers
| Key | Value |
| -------------- | ----------------------------------- |
| `Content-Type` | `application/x-www-form-urlencoded` |
### Body Parameters
| Name | Type | Description |
| ---------- | -------- | ----------------------------------------------------------- |
| `appId` | `string` | The Ditto application ID. |
| `token` | `string` | Application token forwarded to the configured Auth Webhook. |
| `provider` | `string` | Identifier for the authentication provider in ditto. |
### Example Request
```bash theme={null}
curl -X POST /_ditto/auth/http_login \
-H "Content-Type: application/x-www-form-urlencoded" \
-d "appId=8194857f-64ea-491b-b540-0d735b9f10ac" \
-d "token=eyJhdXRoZW50aWNhdGUiOnRydWUsImV4cGlyYXRpb25..." \
-d "provider=my_ditto_auth_provider"
```
### Example Response
```
{
"httpToken": "eyJ0eXAiOiJKV1QiLCJhbGciOiJFUzI1NiJ9...",
"tokenExpiry": "2025-10-15T13:03:21.488844489Z"
}
```
### Example Usage
Include the httpToken in subsequent requests:
```
Authorization: Bearer
```
### JWT Token Usage Notes
• The tokenExpiry is defined by the auth webhook provider response.
• Ideal for integrations with temporary session tokens.
• For static back-end access, use an API key instead.
## Errors
Most HTTP API errors are indicated with an HTTP Status Code and a JSON response body containing an object with a single "error" key.
In some cases such as a Bad Gateway or Request Timeout only a plain text error or `{"message": "Request Timeout"}` JSON object is returned.
If you receive a JSON response containing an `error` field name, its associated field value may be any of the following:
| **Value** | **Description** |
| --------------- | ---------------------------------------------------------------------- |
| `error.code` | The HTTP Status Code for |
| `error.message` | A short description of the error |
| `error.data` | An optional object which contains further elaboration about the error. |
## Transactions
Each write request — either a `POST` or `DELETE` request — to the HTTP API represents a distinct transaction; and each transaction may consist of a single operation or multiple operations.
If a request to insert an event successfully executes on Ditto Server, the server includes a transaction ID in its response. You can then include that ID in subsequent `GET` requests to ensure you're accessing only the most up-to-date and accurate information for that particular event. For more information, see [Transaction IDs](#transaction-ids), as follows.
### Transaction IDs
When retrieving events associated with a specific transaction, ensure data consistency by referencing its unique ID in your `GET` request. By including the transaction ID, you ensure that you're working with the most up-to-date and accurate information by instructing Ditto to wait until the events related to that transaction have been fully applied across the entire Big Peer before accessing it.
If you do *not* supply the transaction ID in your request, Ditto defaults to using the most recent version of the transaction that is common to all Ditto nodes.
Transaction IDs instruct Ditto Server on the order in which transactions should be applied. For more information, see the *Platform Manual* [Cloud Platform](/cloud/overview).
#### Specifying Transactions by ID
When making a `POST` request to `find` a specific event, instruct Ditto to wait until the associated transaction has been fully applied across the entire mesh network before accessing it. This ensures that you're working with the most up-to-date and accurate information.
To specify a transaction by its associated ID, in your `POST` request to the `find` URL endpoint, include the optional `X-DITTO-TXN-ID` header set to the value of the transaction ID. For example, a returned transaction ID of `17`:
If the version of the data being requested is not yet available on the server, an error will be included in the response.
See the below example (replace `{YOUR_CLOUD_URL_ENDPOINT}` with your Cloud URL Endpoint from the portal—see [Getting your Cloud URL Endpoint](/cloud/http-api/getting-started#getting-your-cloud-url-endpoint)):
```bash cURL theme={null}
curl -X POST 'https://{YOUR_CLOUD_URL_ENDPOINT}/api/v4/store/find' \
--header 'Content-Type: application/json' \
--header 'Authorization: Bearer $API_KEY' \
--header 'X-DITTO-TXN-ID: 17'
```
### Including the API Key
Once you've retrieved your API key, you can make requests to Ditto Server by including your key in the `Authorization: Bearer` HTTP header of each of your requests, as demonstrated in the following `POST` request (replace `{YOUR_CLOUD_URL_ENDPOINT}` with your Cloud URL Endpoint from the portal—see [Getting your Cloud URL Endpoint](/cloud/http-api/getting-started#getting-your-cloud-url-endpoint)):
```bash cURL theme={null}
curl -X POST 'https://{YOUR_CLOUD_URL_ENDPOINT}/api/v5/store/execute' \
-H 'Authorization: Bearer {YOUR_API_KEY}' \
-H 'Content-Type: application/json' \
-d '{
"statement": "INSERT INTO people DOCUMENTS (:person)",
"args": {
"person": {
"name": "Susan",
"age": 31
}
}
}'
```
For more DQL query examples, see [Execute a DQL query](/cloud/http-api/api/post-storeexecute).
## JWT Token (HTTP API Access)
In addition to API key authentication, Ditto supports JWT tokens generated by your app’s configured Auth Webhook provider for HTTP API access.\
Use this method if your integration uses an identity provider or requires session-based authentication.
### Endpoint
```
POST /_ditto/auth/http_login
```
### Headers
| Key | Value |
| -------------- | ----------------------------------- |
| `Content-Type` | `application/x-www-form-urlencoded` |
### Body Parameters
| Name | Type | Description |
| ---------- | -------- | ----------------------------------------------------------- |
| `appId` | `string` | The Ditto application ID. |
| `token` | `string` | Application token forwarded to the configured Auth Webhook. |
| `provider` | `string` | Identifier for the authentication provider in ditto. |
### Example Request
```bash theme={null}
curl -X POST /_ditto/auth/http_login \
-H "Content-Type: application/x-www-form-urlencoded" \
-d "appId=8194857f-64ea-491b-b540-0d735b9f10ac" \
-d "token=eyJhdXRoZW50aWNhdGUiOnRydWUsImV4cGlyYXRpb25..." \
-d "provider=my_ditto_auth_provider"
```
### Example Response
```
{
"httpToken": "eyJ0eXAiOiJKV1QiLCJhbGciOiJFUzI1NiJ9...",
"tokenExpiry": "2025-10-15T13:03:21.488844489Z"
}
```
### Example Usage
Include the httpToken in subsequent requests:
```
Authorization: Bearer
```
### JWT Token Usage Notes
• The tokenExpiry is defined by the auth webhook provider response.
• Ideal for integrations with temporary session tokens.
• For static back-end access, use an API key instead.
## Errors
Most HTTP API errors are indicated with an HTTP Status Code and a JSON response body containing an object with a single "error" key.
In some cases such as a Bad Gateway or Request Timeout only a plain text error or `{"message": "Request Timeout"}` JSON object is returned.
If you receive a JSON response containing an `error` field name, its associated field value may be any of the following:
| **Value** | **Description** |
| --------------- | ---------------------------------------------------------------------- |
| `error.code` | The HTTP Status Code for |
| `error.message` | A short description of the error |
| `error.data` | An optional object which contains further elaboration about the error. |
## Transactions
Each write request — either a `POST` or `DELETE` request — to the HTTP API represents a distinct transaction; and each transaction may consist of a single operation or multiple operations.
If a request to insert an event successfully executes on Ditto Server, the server includes a transaction ID in its response. You can then include that ID in subsequent `GET` requests to ensure you're accessing only the most up-to-date and accurate information for that particular event. For more information, see [Transaction IDs](#transaction-ids), as follows.
### Transaction IDs
When retrieving events associated with a specific transaction, ensure data consistency by referencing its unique ID in your `GET` request. By including the transaction ID, you ensure that you're working with the most up-to-date and accurate information by instructing Ditto to wait until the events related to that transaction have been fully applied across the entire Big Peer before accessing it.
If you do *not* supply the transaction ID in your request, Ditto defaults to using the most recent version of the transaction that is common to all Ditto nodes.
Transaction IDs instruct Ditto Server on the order in which transactions should be applied. For more information, see the *Platform Manual* [Cloud Platform](/cloud/overview).
#### Specifying Transactions by ID
When making a `POST` request to `find` a specific event, instruct Ditto to wait until the associated transaction has been fully applied across the entire mesh network before accessing it. This ensures that you're working with the most up-to-date and accurate information.
To specify a transaction by its associated ID, in your `POST` request to the `find` URL endpoint, include the optional `X-DITTO-TXN-ID` header set to the value of the transaction ID. For example, a returned transaction ID of `17`:
If the version of the data being requested is not yet available on the server, an error will be included in the response.
See the below example (replace `{YOUR_CLOUD_URL_ENDPOINT}` with your Cloud URL Endpoint from the portal—see [Getting your Cloud URL Endpoint](/cloud/http-api/getting-started#getting-your-cloud-url-endpoint)):
```bash cURL theme={null}
curl -X POST 'https://{YOUR_CLOUD_URL_ENDPOINT}/api/v4/store/find' \
--header 'Content-Type: application/json' \
--header 'Authorization: Bearer $API_KEY' \
--header 'X-DITTO-TXN-ID: 17'
```