> ## Documentation Index
> Fetch the complete documentation index at: https://docs.ditto.live/llms.txt
> Use this file to discover all available pages before exploring further.
# Ditto Operator (Private Preview)
# Introduction
The Ditto SDK v5 has renamed Application to Database and AppID to DatabaseID. The operator will update this terminology in a future release. This documentation uses the older Application terminology that matches the current release.
The Ditto Operator allows you to deploy Big Peer (aka Ditto Server), Ditto's cloud sync engine and data integration platform, to your own self-hosted Kubernetes environment.
Ditto Operator simplifies the configuration of the various components that form Big Peer, allowing you to focus on developing applications that get you connected to the cloud.
## Prerequisites
A few prerequisites need to be running before you install the Operator and deploy Big Peer.
### Kubernetes Environment
The following steps assume you have a Kubernetes cluster, on at least version 1.31.
If you're looking to try the Operator locally, we recommend using [kind], a tool for running Kubernetes locally using Docker.
Here's an example configuration you can use, which will expose the Big Peer Ingress on your local device, allowing you to follow the steps later in this guide:
```bash theme={null}
cat <<'EOF' | kind create cluster --config -
---
apiVersion: kind.x-k8s.io/v1alpha4
kind: Cluster
kubeadmConfigPatches:
- |
kind: ClusterConfiguration
metadata:
name: config
etcd:
local:
extraArgs:
unsafe-no-fsync: "true"
networking:
serviceSubnet: 10.0.0.0/16
nodes:
- role: control-plane
kubeadmConfigPatches:
- |
kind: InitConfiguration
nodeRegistration:
kubeletExtraArgs:
node-labels: "ingress-ready=true"
extraPortMappings:
- containerPort: 80
hostPort: 80
protocol: TCP
- containerPort: 443
hostPort: 443
protocol: TCP
- containerPort: 4040
hostPort: 4040
protocol: TCP
EOF
```
### Tools
You'll also need to have [kubectl] and [helm] installed, with the appropriate [KUBECONFIG] `current-context` set.
### Installing Certificate Manager
The Ditto Operator uses [cert-manager] to issue various auth-related certificates. You can install [cert-manager] into the target cluster using:
```bash theme={null}
helm install cert-manager cert-manager \
--repo https://charts.jetstack.io \
--namespace cert-manager \
--create-namespace \
--set 'crds.enabled=true' \
--set 'startupapicheck.enabled=false' \
--set 'prometheus.enabled=false'
```
Verify the installation was successful by checking the status of the cert-manager pods:
```bash theme={null}
kubectl get pods -n cert-manager
```
```
NAME READY STATUS RESTARTS AGE
cert-manager-58554cc75d-qcwxc 1/1 Running 0 10s
cert-manager-cainjector-6fbf54b8fb-2wvwq 1/1 Running 0 10s
cert-manager-webhook-6bccd45c78-w8rxm 1/1 Running 0 10s
```
### Installing an Ingress
The Ditto Operator manages ingresses to route traffic into the various Big Peer services.
We recommend using an [ingress-nginx], as specific nginx specific annotations are used for optimal hashing. This guide will assume that nginx is being used.
The Ditto Operator can support other ingress controllers, but these may require different annotations. Please [get in touch](https://support.ditto.com) with Ditto support for guidance.
To install nginx:
If you opted to use Kind config provided to run the cluster locally, run the following:
```bash theme={null}
kubectl apply -f https://kind.sigs.k8s.io/examples/ingress/deploy-ingress-nginx.yaml
```
If you are not installing the [ingress-nginx] in a `kind` cluster, you can run:
```bash theme={null}
helm install ingress-nginx ingress-nginx \
--repo https://kubernetes.github.io/ingress-nginx \
--namespace nginx \
--create-namespace
```
Verify the installation was successful by checking the status of the nginx pods:
```bash theme={null}
kubectl get pods -n ingress-nginx
```
```
NAME READY STATUS RESTARTS AGE
ingress-nginx-admission-create-4pbsb 0/1 Completed 0 10s
ingress-nginx-admission-patch-hgnfp 0/1 Completed 0 10s
ingress-nginx-controller-76666fb69-76fz5 1/1 Running 0 10s
```
### Installing Strimzi
The Ditto Operator uses [strimzi] to create a Kafka cluster and topic for the transaction log. You must install [strimzi], a Kafka Operator, into the target cluster using:
```bash theme={null}
helm install strimzi strimzi-kafka-operator \
--repo https://strimzi.io/charts \
--version 0.49.0 \
--namespace kafka \
--create-namespace \
--set watchAnyNamespace=true
```
`0.49.0` is the latest version of Strimzi compatible with the Ditto Operator. Newer versions (including `1.0.0`) are not yet supported and will cause the Big Peer controller to fail when applying `Kafka` resources.
Verify the installation was successful by checking the status of the strimzi pods:
```bash theme={null}
kubectl get pods -n kafka
```
```
NAME READY STATUS RESTARTS AGE
strimzi-cluster-operator-588bc8c768-dpsdw 1/1 Running 0 10s
```
For convenience, this instructs Strimzi to watch all namespaces for Kafka resources.
If you wish to constrain this behaviour (for example you deploy Kafka for your other applications in another namespace) you can use `--set watchNamespaces` to specify the namespace you're using for Ditto. Eg: `--set watchNamespaces=ditto,another-ditto-namespace`
## Installing the Ditto Operator
With all [prerequisites] taken care of, the latest stable version of the Ditto Operator can be installed using the [helm] [chart] and image located at `oci://quay.io/ditto-external/ditto-operator`:
```bash theme={null}
helm install ditto-operator \
oci://quay.io/ditto-external/ditto-operator \
--namespace ditto \
--create-namespace
```
This installs the Operator into a newly created `ditto` namespace. All further steps will refer to this namespace.
Various configuration options are available in the [chart]'s values.yaml. You can view them with `helm show values oci://quay.io/ditto-external/ditto-operator`.
These values can be overridden using [helm]'s `--set` syntax. Further documentation for these values, and what they do, is coming soon.
You can now verify the Ditto Operator is installed and running with:
```bash theme={null}
kubectl logs -f deployment/ditto-operator --namespace ditto
```
The various Ditto-related CRDs (Custom Resource Definitions) that were installed by the [chart] can be viewed using:
```bash theme={null}
kubectl api-resources | grep ditto.live
```
Which will return output similar to:
```
NAME SHORT_NAME APIVERSION NAMESPACED KIND
bigpeerapikeys bpapikey ditto.live/v1alpha1 true BigPeerApiKey
bigpeerapps bpapp ditto.live/v1alpha1 true BigPeerApp
bigpeerdatabridges bpdatabridge ditto.live/v1alpha1 true BigPeerDataBridge
bigpeerreplications bprep ditto.live/v1alpha1 true BigPeerReplication
bigpeers bp ditto.live/v1alpha1 true BigPeer
bigpeerstores bpstore ditto.live/v1alpha1 true BigPeerStore
bigpeersubscriptions bpsub ditto.live/v1alpha1 true BigPeerSubscription
bigpeersyntheticmonitors bpsynthmon ditto.live/v1alpha1 true BigPeerSyntheticMonitor
```
## Deploying a Big Peer
Here's a minimal example to deploy Big Peer:
```bash theme={null}
cat <<'EOF' | kubectl apply -f -
---
# Create the Big Peer deployment.
apiVersion: ditto.live/v1alpha1
kind: BigPeer
metadata:
name: example
namespace: ditto
spec:
version: 1.59.0
network:
ingress:
host: localhost
auth:
providers:
__playgroundProvider:
anonymous:
permission:
read:
everything: true
queriesByCollection: {}
write:
everything: true
queriesByCollection: {}
sessionLength: 630000
sharedToken: abc123
EOF
```
This will deploy a Big Peer which is:
* Running on version 1.59.0
* Defines an ingress on localhost
* Enables Ditto SDK device auth via the provider named `__playgroundProvider`:
* Devices have read and write access to all collections
* A Small Peer can authenticate using an "Online Playground" identity with a shared token of `abc123`
* This is a global authentication configuration which can be used to authenticate to any app on the Big Peer
[OnlinePlayground](/key-concepts/authentication-and-authorization#online-playground) is ideal for development and testing, as it allows you to quickly define a shared token that can be shared with devices for auth.
[OnlineWithAuthentication](/key-concepts/authentication-and-authorization#online-with-authentication) is more appropriate for production use.
For more on connecting with the SDK, see: [SDK -> Authentication & Authorization](/sdk/latest/auth-and-authorization/cloud-authentication)
Small Peers using an `OnlinePlayground` or `OnlineWithAuthentication` identity try to connect to Ditto's cloud service by default. Extra configuration is required to point it to your Big Peer.
* In the parameters to `OnlinePlayground`, provide a custom authentication URL pointing to the ingress, e.g. "[https://my-host](https://my-host)"
* In the parameters to `OnlinePlayground`, set "enable cloud sync" to `false`
* Set a `TransportConfig` with a websocket URL pointing to your ingress. In the Rust SDK, for example: `transport_config.connect.websocket_urls.insert("wss://my-host".to_owned())`
If the `BigPeer` was applied successfully, the various components of the Big Peer can be observed by running:
```bash theme={null}
kubectl get pods -l ditto.live/big-peer=example --namespace ditto
```
Which will match all running pods with the above `BigPeer`'s `metadata.name`, which is `"example"` in this case:
```
NAMESPACE NAME READY STATUS RESTARTS AGE
ditto ditto-example-api-0 1/1 Running 0 1m20s
ditto ditto-example-store-14d2fe44-0 1/1 Running 0 1m19s
ditto ditto-example-store-6a5d568b-0 1/1 Running 0 1m19s
ditto ditto-example-subscription-a475c814-7b459bfddb-brpr4 1/1 Running 0 1m20s*
```
## Configuring Big Peer
Once Big Peer is deployed, you'll need to configure it for first time usage.
By default, attachments use ephemeral in-memory storage. For production, configure an external attachment backend — see [Attachments](./attachments).
### The Operator API
You can manage Big Peer from within Kubernetes by using Ditto Custom Resources. Alternatively, the Ditto Operator provides a RESTful API for creating Apps and managing their configuration.
At this time, the Operator API does not have an authentication mechanism, and should not be exposed to the publicly. It is intended for use within the K8s cluster only.
To access the API, we recommend port-forwarding to ensure it remains secure and only accessible from your local machine.
For example:
```bash theme={null}
kubectl -n ditto port-forward deployments/ditto-operator 8080:8080
```
**For the purpose of this guide, we'll assume you've port-forwarded in this way.**
### Creating an App
In Ditto, an App is a logical container for your data. An App needs to be registered with Big Peer before you can start creating documents.
Each app has a unique ID that's used to identify it across different Big Peers and devices. You'll use this ID for all interactions with your App, including:
* Connecting to the App from the Ditto SDK
* Making HTTP API calls to the App
* Setting up replication between Big Peers
Using the Operator API is the simplest way to create a new App.
```bash theme={null}
curl -H 'Content-Type: application/json' \
-X POST http://localhost:8080/namespace/ditto/bigPeer/example/app \
-d '{"name":"example-app"}'
```
This will create an App called `example-app`, running on the `example` Big Peer, in the `ditto` namespace.
If successful, you should receive a response like this:
```json theme={null}
{
"name": "example-app",
"appId": "2164bef3-37c0-489c-9ac6-c94b034525d7"
}
```
Take note of the `appId` from the response, you'll need this later to use the HTTP API.
Alternatively, you can create an app by declaring a `BigPeerApp` resource.
```bash theme={null}
cat <<'EOF' | kubectl apply -f -
---
apiVersion: ditto.live/v1alpha1
kind: BigPeerApp
metadata:
name: example-app
namespace: ditto
labels:
ditto.live/big-peer: example
spec:
appId: 2164bef3-37c0-489c-9ac6-c94b034525d7
EOF
```
You're responsible for choosing an App ID when creating an App in this way. It must be a valid UUID, and needs to be unique to each Big Peer.
This will create an App called `example-app`, running on the `example` Big Peer, in the `ditto` namespace.
You can verify that your app was created successfully by checking the status of the `BigPeerApp` resource:
```bash theme={null}
kubectl get bigpeerapp example-app -n ditto
```
### App-scoped Authentication Providers
The auth providers listed in the `BigPeer` resource are available to all apps. You can also configure providers for a specific `BigPeerApp` by including an `auth` configuration. The following example defines an external webhook with the provider name `my-provider`.
```bash theme={null}
cat <<'EOF' | kubectl apply -f -
---
apiVersion: ditto.live/v1alpha1
kind: BigPeerApp
metadata:
name: example-app
namespace: ditto
labels:
ditto.live/big-peer: example
spec:
appId: 2164bef3-37c0-489c-9ac6-c94b034525d7
auth:
my-provider:
tokenWebhook:
url: https://webhook.example.com/validate_token
EOF
```
An `anonymous` provider may also be specified at the app level. Make sure to give it the name `__playgroundProvider` so that it can be used by Ditto SDKs using an `OnlinePlayground` identity.
## Using the Big Peer HTTP API
Using the HTTP API is the quickest way to verify your installation is running.
If you've deployed locally using the `kind` example config provided, these queries should work out of the box.
Otherwise, you may need to update the `localhost` according to the ingress you've configured on your K8s deployment.
### Generate an API Key
To use the Big Peer HTTP API, you'll need to generate an API key. This can only be done using the Operator API.
For this guide, we'll create an API key that can has read and write access to all collections, with a very long expiry. For production scenarios, you may want to customise the scope of the API Keys access, and its expiry.
First, ensure you have port-forwarded to the Operator as described in the [previous section](#the-operator-api).
Then, create an API key for your app using a POST request:
```bash theme={null}
curl -H 'Content-Type: application/json' \
-X POST http://localhost:8080/namespace/ditto/bigPeer/example/app/example-app/apiKey \
-d '{
"name": "my-key",
"expiresAt": "2100-04-13T12:00:00Z",
"permissions": {
"remoteQuery": true,
"read": {
"everything": true,
"queriesByCollection": {}
},
"write": {
"everything": true,
"queriesByCollection": {}
}
}
}'
```
You'll receive the raw API key as the response:
```
YlYr32ZAXotlf9zS1wh8JanJ2kRI2L38KnFHEh6nvaGiqKEqmAf8EsnZ9e0r
```
The raw API key is only shown once and is not stored anywhere. Make sure to save it securely, as you'll need it for all HTTP API requests.
You can verify the API key was created by listing all keys for your app:
```bash theme={null}
curl http://localhost:8080/namespace/ditto/bigPeer/example/app/example-app/apiKey
```
```json theme={null}
{
"meta": {
"page": 1,
"size": 1,
"totalPages": 1
},
"data": [
{
"name": "my-key",
"expiresAt": "2100-04-13T12:00:00Z",
"permissions": {
"remoteQuery": true,
"read": {
"everything": true,
"queriesByCollection": {}
},
"write": {
"everything": true,
"queriesByCollection": {}
}
},
"description": null
}
]
}
```
You can also verify this using `kubectl` as the Operator will make a BigPeerApiKey object to manage this key:
```bash theme={null}
kubectl get bigpeerapikey my-key -n ditto -o yaml
```
```yaml theme={null}
kubectl get bigpeerapikey my-key -n ditto -o yaml
apiVersion: ditto.live/v1alpha1
kind: BigPeerApiKey
metadata:
creationTimestamp: "2025-04-25T14:05:54Z"
generation: 1
labels:
ditto.live/app: example-app
name: my-key
namespace: ditto
resourceVersion: "10664"
uid: 128351cf-4c44-4056-a96d-d0aa6a0b17b4
spec:
expiresAt: "2100-04-13T12:00:00Z"
hash: $scrypt$ln=15,r=8,p=1$DNpYWZdaH+yAgJbnIYu00Q$jshJ3PmHN6qjNwTd+3nlzrtKAcASBAGHazDFUM0agOE
permissions:
read:
everything: true
queriesByCollection: {}
remoteQuery: true
write:
everything: true
queriesByCollection: {}
prefix: 9sNPfXzuBi
version: 0
```
### Insert an item into the `cars` collection
These examples assume you've deployed locally using the `kind` example config provided. If not, you may need to update `localhost` to the hostname you've configured as for your ingress.
Remember to replace `YOUR_API_KEY` with the API key generated earlier.
```bash theme={null}
curl -X POST http://localhost/2164bef3-37c0-489c-9ac6-c94b034525d7/api/v4/store/execute \
--header 'Authorization: bearer YOUR_API_KEY' \
--header 'Content-Type: application/json' \
--data-raw '{"statement":"INSERT INTO cars DOCUMENTS (:doc1)","args":{"doc1":{"_id":{"id":"777","locationId":"123456"},"color":"blue","timestamp":"1732192529"}}}'
```
This:
* Uses the API key generated earlier
* Inserts a new document into the `cars` collection, which will implicitly be created
### List all items in the `cars` collection
We can then verify that the document was created with:
```bash theme={null}
curl -X POST http://localhost/2164bef3-37c0-489c-9ac6-c94b034525d7/api/v4/store/execute \
--header 'Authorization: bearer YOUR_API_KEY' \
--header 'Content-Type: application/json' \
--data-raw '{"statement":"SELECT * FROM cars"}'
```
## Connecting with the Ditto SDK
The Ditto Quickstart apps are the quickest way to get started using the Ditto SDK with an Operator managed Big Peer.
Quickstart apps are available for various platforms including Swift, Java, React Native, Flutter, and more. You can find them in our [GitHub repository](https://github.com/getditto/quickstart).
To get connected with minimal configuration for development and testing, we recommend using [OnlinePlayground authentication](/key-concepts/authentication-and-authorization#online-playground). The [Big Peer](#deploying-a-big-peer) we deployed earlier has an `OnlinePlayground` auth provider configured with a shared token of `abc123`.
```bash theme={null}
git clone https://github.com/getditto/quickstart.git
```
```bash theme={null}
cp .env.sample .env
```
Edit the `.env` file to set the following variables:
| Variable | Description |
| ------------------------ | --------------------------------------------------------------------------------- |
| `DITTO_APP_ID` | The App ID of your `BigPeerApp` you wish to connect to |
| `DITTO_AUTH_URL` | The auth URL of your Big Peer, as specified in the `BigPeer` network.ingress |
| `DITTO_WEBSOCKET_URL` | The websocket URL of your Big Peer, as specified in the `BigPeer` network.ingress |
| `DITTO_PLAYGROUND_TOKEN` | The playground token configured in your Big Peer's auth provider |
If you've deployed using our suggested kind example config, and deployed a [Big Peer](#deploying-a-big-peer) and [App](#creating-an-app) per this guide, these values will be:
```
DITTO_APP_ID=2164bef3-37c0-489c-9ac6-c94b034525d7
DITTO_AUTH_URL=http://localhost
DITTO_WEBSOCKET_URL=ws://localhost
DITTO_PLAYGROUND_TOKEN=abc123
```
Follow the steps README in the Quickstart repository for the SDK you're using to run the app.
For example, for the JavaScript TUI Quickstart app, you'll need to run:
```bash theme={null}
cd javascript-tui
npm install
npm start 2>/dev/null
```
The Quickstart app should launch and display "Sync Active". You can then create some tasks.
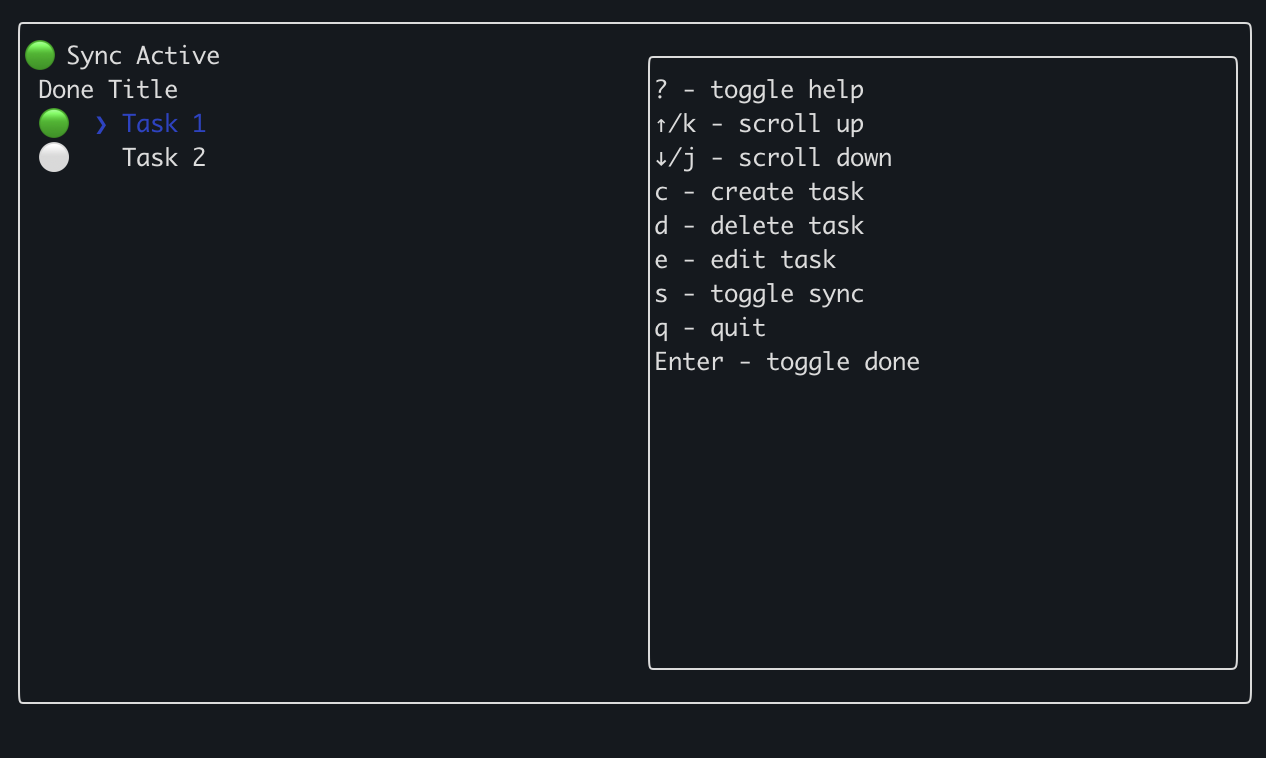 To verify the tasks are being synced to your Big Peer, you can start another instance of the Quickstart app and confirm the tasks you've created are visible.
You can also verify this by querying the `tasks` collection using the HTTP API:
```bash theme={null}
curl -X POST http://localhost/2164bef3-37c0-489c-9ac6-c94b034525d7/api/v4/store/execute \
--header "Authorization: bearer YOUR_API_KEY" \
--header "Content-Type: application/json" \
--data-raw '{"statement":"SELECT * FROM tasks"}'
```
## Troubleshooting
### Deleting the transaction log Kafka topic
If you find yourself needing to delete the transaction log Kafka topic, such as when attempting to reinstall Big Peer to a clean slate and discard past data, be aware that the transaction log topic has deletion protection enabled by default. Forcing the deletion, such as via removing the finalizer on the `KafkaTopic` custom resource, can cause the Kafka brokers and Strimzi operator to retain old state, such as transaction offsets.
In order to cleanly delete the topic, you'll need to override this setting within the `BigPeer` custom resource:
```yaml theme={null}
apiVersion: ditto.live/v1alpha1
kind: BigPeer
...
spec:
transactions:
kafka:
strimzi:
config:
delete.topic.enable: true
```
With that setting in place, you'll be able to remove the `KafkaTopic`, allowing the Ditto Operator to cleanly recreate it without past data or offsets.
## Uninstalling using Helm
Before continuing, ensure any Big Peer resources that were created have been deleted. You can check for existing resources using the following command:
```bash theme={null}
kubectl get bigpeers,bigpeerapps --namespace ditto
```
It is recommended you delete these resources before uninstalling the Ditto Operator. Otherwise, if you plan to reinstall the Ditto Operator again later the new installation will immediately discover the previous resources and proceed to create them anew.
You can now delete the [helm] release that was created in [Installing the Ditto Operator]:
```bash theme={null}
helm delete ditto-operator
```
[Prerequisites]: #prerequisites
[Installing Certificate Manager]: #installing-certificate-manager
[Installing Ingress Nginx]: #installing-ingress-nginx
[Installing Strimzi and Kafka]: #installing-strimzi-and-kafka
[Installing the Ditto Operator]: #installing
[Installing the Dummy Auth Webhook]: #installing-the-dummy-auth-webhook
[Deploying a Big Peer]: #deploying-a-big-peer
[Using the HTTP API]: #using-the-http-api
[Uninstallation using Helm]: #uninstallation-using-helm
[Limitations and Caveats]: #limitations-and-caveats
[Appendix A: Creating a local `kind` cluster]: #appendix-a-creating-a-local-kind-cluster
[kubectl]: https://kubernetes.io/docs/reference/kubectl
[KUBECONFIG]: https://kubernetes.io/docs/concepts/configuration/organize-cluster-access-kubeconfig
[helm]: https://helm.sh
[helm install]: https://helm.sh/docs/helm/helm_install
[cert-manager]: https://cert-manager.io
[strimzi]: https://strimzi.io
[ingress-nginx]: https://kubernetes.github.io/ingress-nginx/
[kind]: https://kind.sigs.k8s.io
[kind ingress user guide]: https://kind.sigs.k8s.io/docs/user/ingress
[ingress controller]: https://kubernetes.io/docs/concepts/services-networking/ingress-controllers
[these instructions first]: #appendix-a-creating-a-local-kind-cluster
[chart]: ../charts/operator
[values.yaml]: ../charts/operator/values.yaml
[Dummy Auth Webhook]: ../hydra/dummy-auth-webhook
[example-full.yaml]: ./example-full.yaml
To verify the tasks are being synced to your Big Peer, you can start another instance of the Quickstart app and confirm the tasks you've created are visible.
You can also verify this by querying the `tasks` collection using the HTTP API:
```bash theme={null}
curl -X POST http://localhost/2164bef3-37c0-489c-9ac6-c94b034525d7/api/v4/store/execute \
--header "Authorization: bearer YOUR_API_KEY" \
--header "Content-Type: application/json" \
--data-raw '{"statement":"SELECT * FROM tasks"}'
```
## Troubleshooting
### Deleting the transaction log Kafka topic
If you find yourself needing to delete the transaction log Kafka topic, such as when attempting to reinstall Big Peer to a clean slate and discard past data, be aware that the transaction log topic has deletion protection enabled by default. Forcing the deletion, such as via removing the finalizer on the `KafkaTopic` custom resource, can cause the Kafka brokers and Strimzi operator to retain old state, such as transaction offsets.
In order to cleanly delete the topic, you'll need to override this setting within the `BigPeer` custom resource:
```yaml theme={null}
apiVersion: ditto.live/v1alpha1
kind: BigPeer
...
spec:
transactions:
kafka:
strimzi:
config:
delete.topic.enable: true
```
With that setting in place, you'll be able to remove the `KafkaTopic`, allowing the Ditto Operator to cleanly recreate it without past data or offsets.
## Uninstalling using Helm
Before continuing, ensure any Big Peer resources that were created have been deleted. You can check for existing resources using the following command:
```bash theme={null}
kubectl get bigpeers,bigpeerapps --namespace ditto
```
It is recommended you delete these resources before uninstalling the Ditto Operator. Otherwise, if you plan to reinstall the Ditto Operator again later the new installation will immediately discover the previous resources and proceed to create them anew.
You can now delete the [helm] release that was created in [Installing the Ditto Operator]:
```bash theme={null}
helm delete ditto-operator
```
[Prerequisites]: #prerequisites
[Installing Certificate Manager]: #installing-certificate-manager
[Installing Ingress Nginx]: #installing-ingress-nginx
[Installing Strimzi and Kafka]: #installing-strimzi-and-kafka
[Installing the Ditto Operator]: #installing
[Installing the Dummy Auth Webhook]: #installing-the-dummy-auth-webhook
[Deploying a Big Peer]: #deploying-a-big-peer
[Using the HTTP API]: #using-the-http-api
[Uninstallation using Helm]: #uninstallation-using-helm
[Limitations and Caveats]: #limitations-and-caveats
[Appendix A: Creating a local `kind` cluster]: #appendix-a-creating-a-local-kind-cluster
[kubectl]: https://kubernetes.io/docs/reference/kubectl
[KUBECONFIG]: https://kubernetes.io/docs/concepts/configuration/organize-cluster-access-kubeconfig
[helm]: https://helm.sh
[helm install]: https://helm.sh/docs/helm/helm_install
[cert-manager]: https://cert-manager.io
[strimzi]: https://strimzi.io
[ingress-nginx]: https://kubernetes.github.io/ingress-nginx/
[kind]: https://kind.sigs.k8s.io
[kind ingress user guide]: https://kind.sigs.k8s.io/docs/user/ingress
[ingress controller]: https://kubernetes.io/docs/concepts/services-networking/ingress-controllers
[these instructions first]: #appendix-a-creating-a-local-kind-cluster
[chart]: ../charts/operator
[values.yaml]: ../charts/operator/values.yaml
[Dummy Auth Webhook]: ../hydra/dummy-auth-webhook
[example-full.yaml]: ./example-full.yaml