> ## Documentation Index
> Fetch the complete documentation index at: https://docs.ditto.live/llms.txt
> Use this file to discover all available pages before exploring further.
# React Native
> This article provides instructions on adding and integrating Ditto to your React Native project, ensuring successful syncing.
Ditto for React Native runs on both [Bare
CLI](https://reactnative.dev/docs/getting-started-without-a-framework) and
[Expo](https://reactnative.dev/docs/environment-setup#start-a-new-react-native-project-with-expo)
environments. Platform support: iOS and Android (CLI + Expo), macOS (CLI only).
Set up your React Native project (either CLI or Expo) ([Prerequisites](#prerequisites)).
Install the Ditto package into your project. ([Installing the Ditto
SDK](#installing-the-ditto-sdk))
Install the project dependencies. ([Installing
Dependencies](#installing-dependencies))
If using Expo Dev Builds, configure Ditto with the Expo plugin. If using React
Native CLI, configure iOS and Android permissions. ([Expo Setup](#expo-setup)
or [Configuring Permissions](#configuring-permissions-non-expo-only))
If using React Native CLI (Android), handle runtime permissions. ([Handling
Permissions](#handling-permissions))
Set up authentication. ([Setting Up
Authentication](#setting-up-authentication))
Specify how Ditto should handle sync. ([Creating a New Instance of
Ditto](#creating-a-new-instance-of-ditto))
Configure peer-to-peer transport options. ([Setting Transport
Configurations](#setting-transport-configurations))
Add Sync Subscription logic. ([Constructing Sync Subscription Logic](#constructing-sync-subscription-logic))
Start the sync process. ([Starting the Sync
Process](#starting-the-sync-process))
(Optional) Monitor remote peers. ([Setting Up Presence](#setting-up-presence))
(Optional) Set logs to debug. ([Setting the Logs to Debug
Level](#setting-logs-to-debug-level))
(Optional) Declare a foreground service (Android Only). ([Declaring a
Foreground Service](#declaring-a-foreground-service-android-only))
## Prerequisites
First, set up your environment and initialize your React Native project. For instructions, see React Native's official documentation on Get Started with React Native.
To verify that you’ve set up your environment correctly, install and run the
React Native CLI doctor. For more information, see the official blog post:
Meet Doctor, a new React Native command
## Installing the Ditto SDK
From a terminal, navigate to the folder containing your React Native project, and then, using your preferred package manager, run the Ditto package:
```bash yarn theme={null}
yarn add @dittolive/ditto
```
```bash npm theme={null}
npm install @dittolive/ditto
```
```bash pnpm theme={null}
pnpm add @dittolive/ditto
```
## Installing Dependencies
From the root of your project, install project dependencies based on the `package.json` file:
```bash yarn theme={null}
yarn install
```
```bash npm theme={null}
npm install
```
```bash pnpm theme={null}
pnpm install
```
If you're using Expo, install these additional dependencies:
```bash yarn theme={null}
yarn add @expo/config-plugins expo-build-properties
```
```bash npm theme={null}
npm install @expo/config-plugins expo-build-properties
```
```bash pnpm theme={null}
pnpm add @expo/config-plugins expo-build-properties
```
## Expo Setup
**iOS and Android only** - Expo does not support macOS. For macOS development, use React Native CLI.
Expo Go is **not compatible** with this SDK because it does not support custom
native modules. You will need to use [Expo Dev
Builds](https://docs.expo.dev/develop/development-builds/create-a-build)
(version 50+).
The React Native SDK provides [an Expo Config Plugin](https://docs.expo.dev/config-plugins/introduction/) to integrate Ditto into your **Expo Dev Builds** project. To enable this plugin, modify either `app.json` or `app.config.js`, depending on your project's configuration:
```json app.json theme={null}
{
"expo": {
"plugins": ["@dittolive/ditto"]
}
}
```
```js app.config.js theme={null}
export default {
expo: {
plugins: ["@dittolive/ditto"],
},
};
```
### Additional Requirements for Older Expo Projects
For older projects that have not yet migrated to:
* Android `minSdkVersion` **24**
* Kotlin version **1.9.0**
* iOS Deployment Target **15.0**
Configure `expo-build-properties` to ensure compatibility. Add the following to `app.json` or `app.config.js`:
```json app.json theme={null}
{
"expo": {
"plugins": [
"@dittolive/ditto",
[
"expo-build-properties",
{
"android": {
"minSdkVersion": 24,
"kotlinVersion": "1.9.0"
},
"ios": {
"deploymentTarget": "15.0"
}
}
]
]
}
}
```
```js app.config.js theme={null}
export default {
expo: {
plugins: [
"@dittolive/ditto",
[
"expo-build-properties",
{
android: {
minSdkVersion: 24,
kotlinVersion: "1.9.0",
},
ios: {
deploymentTarget: "15.0",
},
},
],
],
},
};
```
### Additional Parameters (iOS only)
The Ditto Expo plugin allows additional iOS prompts configurations, which are applied in the following order of priority:
1. Explicitly defined parameters in `app.json` or `app.config.js`.
2. If no parameters are set, it falls back to the iOS native project’s `Info.plist`.
3. If no values are found, Ditto uses its default values.
Below you will find an example of how to specify your values for the parameters.
```json app.json theme={null}
{
"expo": {
"plugins": [
[
"@dittolive/ditto",
{
"bluetoothUsageDescription": "My custom BLE usage prompt message.",
"localNetworkUsageDescription": "My custom LAN usage prompt message."
}
]
]
}
}
```
```js app.config.js theme={null}
export default {
expo: {
plugins: [
[
"@dittolive/ditto",
{
bluetoothUsageDescription: "My custom BLE usage prompt message.",
localNetworkUsageDescription: "My custom LAN usage prompt message.",
},
],
],
},
};
```
## Configuring Permissions (non-Expo only)
Once you've added dependencies, set up the prerequisites to enable Ditto Transports for iOS, Android, and macOS.
### iOS and macOS
From Xcode, enable Bluetooth LE and local network services in your app:
Install pods and make sure you use a compatible minimum deployment target.
**For iOS projects**, from the `ios/Podfile` file in your project:
```
platform :ios, 15
```
**For macOS projects**, from the `macos/Podfile` file in your project:
```
platform :macos, '11.0'
```
Tip: No version changes are needed for RN 0.76+ projects that already have the minimum versions configured.
Be sure to reinstall Pods afterward:
```
pod install
```
From your project's `Info.plist` file (iOS: `ios/YourApp/Info.plist`, macOS: `macos/YourApp/Info.plist`), add the following key-value pairs:
```xml Info.plist theme={null}
NSBluetoothAlwaysUsageDescription
Uses Bluetooth to connect and sync with nearby devices.
NSLocalNetworkUsageDescription
Uses WiFi to connect and sync with nearby devices.
NSBonjourServices
_http-alt._tcp.
```
Tip: To view `Info.plist` as source code, right-click the file from the left sidebar in Xcode > click **Open As** > and then select **Source Code** from the menu.
If desired, customize the default values for the permission prompts by replacing them with your preferred text.
For example, if your end users prefer a language other than English, you can replace the default English strings with their language equivalents.
Once implemented, these string values display to your end users as dismissable prompts explaining why the app requires certain permissions.
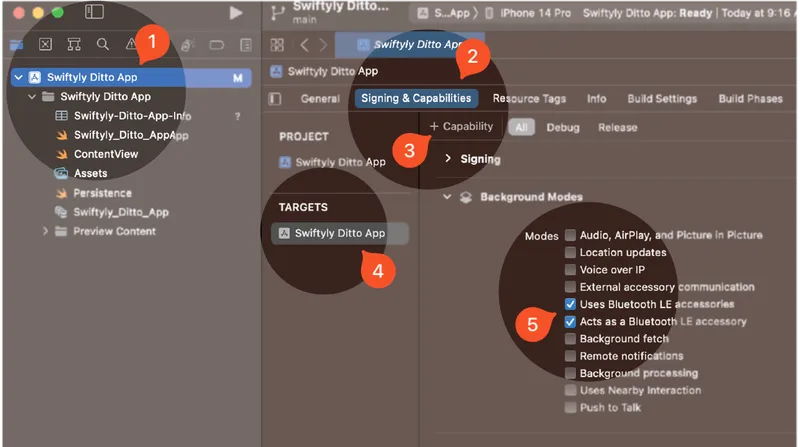
**iOS only:** Ensure your app continues to sync while it runs in the background by enabling Bluetooth LE background modes. Once enabled, your app continuously syncs in the background, even while the device is locked.
**Note:** Background modes are not available on macOS. This step only applies to iOS apps.
For official instructions, see *Configuring background execution modes* from Apple.
1. From the left sidebar, click to select your project.
2. Click **Signing & Capabilities**.
3. Click **+ Capability,** and then from the modal that appears, search and select **Background Modes**.
4. From **TARGETS**, select your iOS app from the list.
5. From **Background Modes**, toggle the following:
* **Uses Bluetooth LE accessories**
* **Acts as a Bluetooth LE accessory**
 ### Android
From Android Studio, set up transport configurations for the Android target:
Update Android's minimum SDK version to `24` or higher:
1. Open the project-level `build.gradle` located in the `android` root directory.
2. Set the `minSDKVersion` to `24`.
**Declaring Permissions in the Android Manifest**
Android requires certain permissions to be explicitly requested by the app to access features like Bluetooth Low Energy and Wi-Fi Aware. These permissions must be declared in the app's manifest file and requested from the end user at runtime.
The Ditto SDK's `AndroidManifest.xml` includes all of the necessary permissions for enabling its mesh network capabilities. These permissions will automatically be merged with your app's permissions, so you should be aware of them.
```xml AndroidManifest.xml theme={null}
```
Some of these permissions have an `android:maxSdkVersion` attribute which means they are not used on devices running newer versions of Android. This is a best practice to respect users' privacy when those permissions are not necessary.
However, some apps may still need to use one or more of the above permissions across more versions of Android. This can be accomplished by overriding the permission configuration in your app's `AndroidManifest.xml`
To override any of these permission limitations in your app, do the following:
Open the `AndroidManifest.xml` located in the `app/src/main` directory of your project.
Within the same `` tag, just before the `` tag, add the relevant permissions you want to configure (location example):
```xml AndroidManifest.xml theme={null}
```
Note the additional `tools:remove` attribute. This tells the manifest merger to selectively remove the `android:maxSdkVersion` behavior from the associated permissions, changing them to apply to all Android versions.
For more information, see the official [Permissions on Android](https://developer.android.com/guide/topics/permissions/overview "Permissions on Android") and [Merge manifest files](https://developer.android.com/build/manage-manifests "Merge manifest files") documentation.
Add the following code snippet to the module-level `build.gradle` located in the `android/app` directory:
```gradle android/app/build.gradle theme={null}
android {
packagingOptions {
pickFirst 'lib/**/libdittoffi.so'
pickFirst 'lib/**/libjsi.so'
pickFirst 'lib/**/libreact_nativemodule_core.so'
pickFirst 'lib/**/libturbomodulejsijni.so'
pickFirst 'lib/**/libreactnative.so'
}
// Rest of the file
}
```
Start the app in Metro:
```bash yarn theme={null}
yarn start
```
```bash npm theme={null}
npm start
```
```bash pnpm theme={null}
pnpm start
```
## Handling Permissions
Within your default React component (`App`), use this helper function to request permissions if developing for the Android target:
```javascript App.jsx theme={null}
import {useEffect} from 'react';
import {PermissionsAndroid, Platform} from 'react-native';
export default function App() {
async function requestPermissions() {
if (Platform.OS !== 'android') {
return;
}
const granted = await PermissionsAndroid.requestMultiple([
PermissionsAndroid.PERMISSIONS.BLUETOOTH_CONNECT,
PermissionsAndroid.PERMISSIONS.BLUETOOTH_ADVERTISE,
PermissionsAndroid.PERMISSIONS.NEARBY_WIFI_DEVICES,
PermissionsAndroid.PERMISSIONS.BLUETOOTH_SCAN,
]);
Object.entries(granted).forEach(([permission, result]) => {
if (result === PermissionsAndroid.RESULTS.GRANTED) {
console.log(`${permission} granted`);
} else {
console.log(`${permission} denied`);
}
});
}
useEffect(() => {
requestPermissions();
}, []);
}
```
```typescript App.tsx theme={null}
import { useEffect } from 'react';
import { PermissionsAndroid, Platform } from 'react-native';
import type { Permission } from 'react-native';
export default function App(): JSX.Element {
async function requestPermissions(): Promise {
if (Platform.OS !== 'android') {
return;
}
const granted = await PermissionsAndroid.requestMultiple([
PermissionsAndroid.PERMISSIONS.BLUETOOTH_CONNECT,
PermissionsAndroid.PERMISSIONS.BLUETOOTH_ADVERTISE,
PermissionsAndroid.PERMISSIONS.NEARBY_WIFI_DEVICES,
PermissionsAndroid.PERMISSIONS.BLUETOOTH_SCAN,
]);
Object.entries(granted).forEach(([permission, result]: [string, string]) => {
if (result === PermissionsAndroid.RESULTS.GRANTED) {
console.log(`${permission} granted`);
} else {
console.log(`${permission} denied`);
}
});
}
useEffect(() => {
requestPermissions();
}, []);
}
```
## Setting Up Configuration & Authentication
Configure your Ditto instance by creating a config object and opening Ditto with it.
### Server Mode with Authentication
For applications that need to sync with Ditto's cloud infrastructure:
```javascript JavaScript theme={null}
import { Ditto, DittoConfig, Authenticator } from '@dittolive/ditto';
// Create configuration
const databaseId = 'REPLACE_ME_WITH_YOUR_DATABASE_ID';
const connectConfig = {
mode: 'server',
// Copy the URL from the Ditto Portal (Connect via SDK)
url: 'REPLACE_ME_WITH_YOUR_URL',
};
const config = new DittoConfig(databaseId, connectConfig);
// Open Ditto with the configuration
const ditto = await Ditto.open(config);
// Set up token refresh handler
await ditto.auth.setExpirationHandler(async (ditto, timeUntilExpiration) => {
console.log('Token expiring soon:', timeUntilExpiration);
if (ditto.auth.loginSupported) {
const result = await ditto.auth.login('YOUR_TOKEN', Authenticator.DEVELOPMENT_PROVIDER);
if (result.error) {
console.error('Re-authentication failed:', result.error);
}
}
});
```
```typescript TypeScript theme={null}
import { Ditto, DittoConfig, Authenticator } from '@dittolive/ditto';
// Create configuration
const databaseId: string = 'REPLACE_ME_WITH_YOUR_DATABASE_ID';
const connectConfig = {
mode: 'server' as const,
// Copy the URL from the Ditto Portal (Connect via SDK)
url: 'REPLACE_ME_WITH_YOUR_URL',
};
const config: DittoConfig = new DittoConfig(databaseId, connectConfig);
// Open Ditto with the configuration
const ditto: Ditto = await Ditto.open(config);
// Set up token refresh handler
await ditto.auth.setExpirationHandler(async (ditto: Ditto, timeUntilExpiration: number) => {
console.log('Token expiring soon:', timeUntilExpiration);
if (ditto.auth.loginSupported) {
const result = await ditto.auth.login('YOUR_TOKEN', Authenticator.DEVELOPMENT_PROVIDER);
if (result.error) {
console.error('Re-authentication failed:', result.error);
}
}
});
```
### Local Only Mode (No Internet)
For offline-only applications that only sync peer-to-peer:
```javascript JavaScript theme={null}
import { Ditto, DittoConfig } from '@dittolive/ditto';
const databaseId = 'REPLACE_ME_WITH_YOUR_DATABASE_ID';
const connectConfig = {
mode: 'smallPeersOnly',
};
const config = new DittoConfig(databaseId, connectConfig);
const ditto = await Ditto.open(config);
```
```typescript TypeScript theme={null}
import { Ditto, DittoConfig } from '@dittolive/ditto';
const databaseId: string = 'REPLACE_ME_WITH_YOUR_DATABASE_ID';
const connectConfig = {
mode: 'smallPeersOnly' as const,
};
const config: DittoConfig = new DittoConfig(databaseId, connectConfig);
const ditto: Ditto = await Ditto.open(config);
```
## Setting Transport Configurations
Using `updateTransportConfig`, do the following to set up transport configurations in your app:
Configure peer-to-peer transport settings so that all desired transport types available on the end-user device are available to Ditto.
Specify how you want Ditto to handle which transports to sync data across the mesh.
```javascript JS Automatic theme={null}
ditto.updateTransportConfig((transportsConfig) => {
// For React Native apps, use setAvailablePeerToPeerEnabled to automatically
// enable all transports that are available on the current platform
transportsConfig.setAvailablePeerToPeerEnabled(true);
});
```
```typescript TS Automatic theme={null}
import { TransportConfig } from '@dittolive/ditto';
ditto.updateTransportConfig((transportsConfig: TransportConfig): void => {
// For React Native apps, use setAvailablePeerToPeerEnabled to automatically
// enable all transports that are available on the current platform
transportsConfig.setAvailablePeerToPeerEnabled(true);
});
```
```javascript JS Manual theme={null}
import {Platform} from 'react-native';
// ... Ditto init logic
ditto.updateTransportConfig((transportsConfig) => {
transportsConfig.peerToPeer.bluetoothLE.isEnabled = true;
transportsConfig.peerToPeer.lan.isEnabled = true;
transportsConfig.peerToPeer.lan.isMdnsEnabled = true;
// Apple Wireless Direct Link is available on iOS and macOS
if (Platform.OS === 'ios' || Platform.OS === 'macos') {
transportsConfig.peerToPeer.awdl.isEnabled = true;
}
// WiFi Aware is available on Android
if (Platform.OS === 'android') {
transportsConfig.peerToPeer.wifiAware.isEnabled = true;
}
})
```
```typescript TS Manual theme={null}
import { Platform } from 'react-native';
import { TransportConfig } from '@dittolive/ditto';
// ... Ditto init logic
ditto.updateTransportConfig((transportsConfig: TransportConfig): void => {
transportsConfig.peerToPeer.bluetoothLE.isEnabled = true;
transportsConfig.peerToPeer.lan.isEnabled = true;
transportsConfig.peerToPeer.lan.isMdnsEnabled = true;
// Apple Wireless Direct Link is available on iOS and macOS
if (Platform.OS === 'ios' || Platform.OS === 'macos') {
transportsConfig.peerToPeer.awdl.isEnabled = true;
}
// WiFi Aware is available on Android
if (Platform.OS === 'android') {
transportsConfig.peerToPeer.wifiAware.isEnabled = true;
}
});
```
## Constructing Sync Subscription Logic
Create the logic that performs sync and data operations in your app, including registering subscriptions, executing store operations, and observing changes in the given collection.
For example, the following snippet defines a document object (`document`), creates a subscription for the `Cars` collection, executes database operations and logs the results, registers an observer for watching changes in the `Cars` collection:
```javascript JavaScript theme={null}
// ... Ditto init logic
ditto.sync.registerSubscription(`SELECT * FROM cars`);
const document = {
id: 987654,
_id: 123131,
model: "CX-5",
make: "Mazda",
color: "blue",
};
const queryResult = await ditto.store.execute(
"INSERT INTO cars VALUES (:document) ON ID CONFLICT DO UPDATE",
{ document }
);
console.log(queryResult.items.map((item) => item.value));
console.log(
"mutated",
queryResult.mutatedDocumentIDs().map((docId) => docId.value)
);
ditto.store.registerObserver(`SELECT * FROM cars`, (response) => {
const parsedDocuments = response.items.map((doc) => {
return doc.value;
});
// save state or other use cases
});
```
```typescript TypeScript theme={null}
import { SyncSubscription, QueryResult, StoreObserver, QueryResultItem } from '@dittolive/ditto';
// ... Ditto init logic
interface Car {
id: number;
_id: number;
model: string;
make: string;
color: string;
}
const subscription: SyncSubscription = ditto.sync.registerSubscription(`SELECT * FROM cars`);
const document: Car = {
id: 987654,
_id: 123131,
model: "CX-5",
make: "Mazda",
color: "blue",
};
const queryResult: QueryResult = await ditto.store.execute(
"INSERT INTO cars VALUES (:document) ON ID CONFLICT DO UPDATE",
{ document }
);
console.log(queryResult.items.map((item: QueryResultItem) => item.value));
console.log(
"mutated",
queryResult.mutatedDocumentIDs().map((docId) => docId.value)
);
const observer: StoreObserver = ditto.store.registerObserver(`SELECT * FROM cars`, (response: QueryResult) => {
const parsedDocuments: Car[] = response.items.map((doc: QueryResultItem) => {
return doc.value as Car;
});
// save state or other use cases
});
```
## Starting the Sync Process
To start syncing with other peers in the mesh:
```javascript JavaScript theme={null}
ditto.sync.start();
```
```typescript TypeScript theme={null}
ditto.sync.start();
```
## Setting Up Presence
Monitor remote peers in the logs or using Ditto’s Presence Viewer app. For more information, see the blog post “[An explanation of the Ditto Presence Viewer.](https://www.ditto.com/blog/ditto-presence-viewer)”
To set up presence observations:
```javascript JavaScript theme={null}
// This closure is called every time the mesh of
// connected Ditto peers changes:
ditto.presence.observe((graph) => {
console.log('Peers: ', graph.remotePeers);
});
```
```typescript TypeScript theme={null}
import { PresenceGraph, PresenceObserver } from '@dittolive/ditto';
// This closure is called every time the mesh of
// connected Ditto peers changes:
const observer: PresenceObserver = ditto.presence.observe((graph: PresenceGraph) => {
console.log('Peers: ', graph.remotePeers);
});
```
## Setting Logs to Debug Level
Capture database debug logs by setting the Ditto log level to Debug mode. That way, any potential issues are tracked.
To set the minimum log level to `Debug`:
```javascript JavaScript theme={null}
import {Logger} from '@dittolive/ditto';
// ...
Logger.minimumLogLevel = 'Debug';
```
```typescript TypeScript theme={null}
import { Logger, LogLevel } from '@dittolive/ditto';
// ...
Logger.minimumLogLevel = 'Debug' as LogLevel;
```
## Declaring a Foreground Service (Android Only)
A [foreground service](https://developer.android.com/develop/background-work/services/fgs) allows your app to continue syncing data with Ditto while running in the background. A foreground service is not required to use Ditto, but without it your app will stop syncing whenever it is in the background.
To declare the foreground service, add the following to your `AndroidManifest.xml`:
```xml theme={null}
```
Make sure you customize the service metadata--it will be displayed to the user in the foreground service notification. Note that your `small_app_icon` drawable must be monochrome white.
The foreground service will be automatically started and stopped on `startSync()` and `stopSync()`, respectively.
## Known issues
1. [React Native's Fast Refresh](https://reactnative.dev/docs/fast-refresh) will throw an error with the current Ditto architecture, insisting you provide a different persistence directory name. Currently, no workaround is available; however, developers can disable Fast Refresh to avoid this issue. Our team is actively working on a fix, and we appreciate your patience as we address this challenge.
### Android
From Android Studio, set up transport configurations for the Android target:
Update Android's minimum SDK version to `24` or higher:
1. Open the project-level `build.gradle` located in the `android` root directory.
2. Set the `minSDKVersion` to `24`.
**Declaring Permissions in the Android Manifest**
Android requires certain permissions to be explicitly requested by the app to access features like Bluetooth Low Energy and Wi-Fi Aware. These permissions must be declared in the app's manifest file and requested from the end user at runtime.
The Ditto SDK's `AndroidManifest.xml` includes all of the necessary permissions for enabling its mesh network capabilities. These permissions will automatically be merged with your app's permissions, so you should be aware of them.
```xml AndroidManifest.xml theme={null}
```
Some of these permissions have an `android:maxSdkVersion` attribute which means they are not used on devices running newer versions of Android. This is a best practice to respect users' privacy when those permissions are not necessary.
However, some apps may still need to use one or more of the above permissions across more versions of Android. This can be accomplished by overriding the permission configuration in your app's `AndroidManifest.xml`
To override any of these permission limitations in your app, do the following:
Open the `AndroidManifest.xml` located in the `app/src/main` directory of your project.
Within the same `` tag, just before the `` tag, add the relevant permissions you want to configure (location example):
```xml AndroidManifest.xml theme={null}
```
Note the additional `tools:remove` attribute. This tells the manifest merger to selectively remove the `android:maxSdkVersion` behavior from the associated permissions, changing them to apply to all Android versions.
For more information, see the official [Permissions on Android](https://developer.android.com/guide/topics/permissions/overview "Permissions on Android") and [Merge manifest files](https://developer.android.com/build/manage-manifests "Merge manifest files") documentation.
Add the following code snippet to the module-level `build.gradle` located in the `android/app` directory:
```gradle android/app/build.gradle theme={null}
android {
packagingOptions {
pickFirst 'lib/**/libdittoffi.so'
pickFirst 'lib/**/libjsi.so'
pickFirst 'lib/**/libreact_nativemodule_core.so'
pickFirst 'lib/**/libturbomodulejsijni.so'
pickFirst 'lib/**/libreactnative.so'
}
// Rest of the file
}
```
Start the app in Metro:
```bash yarn theme={null}
yarn start
```
```bash npm theme={null}
npm start
```
```bash pnpm theme={null}
pnpm start
```
## Handling Permissions
Within your default React component (`App`), use this helper function to request permissions if developing for the Android target:
```javascript App.jsx theme={null}
import {useEffect} from 'react';
import {PermissionsAndroid, Platform} from 'react-native';
export default function App() {
async function requestPermissions() {
if (Platform.OS !== 'android') {
return;
}
const granted = await PermissionsAndroid.requestMultiple([
PermissionsAndroid.PERMISSIONS.BLUETOOTH_CONNECT,
PermissionsAndroid.PERMISSIONS.BLUETOOTH_ADVERTISE,
PermissionsAndroid.PERMISSIONS.NEARBY_WIFI_DEVICES,
PermissionsAndroid.PERMISSIONS.BLUETOOTH_SCAN,
]);
Object.entries(granted).forEach(([permission, result]) => {
if (result === PermissionsAndroid.RESULTS.GRANTED) {
console.log(`${permission} granted`);
} else {
console.log(`${permission} denied`);
}
});
}
useEffect(() => {
requestPermissions();
}, []);
}
```
```typescript App.tsx theme={null}
import { useEffect } from 'react';
import { PermissionsAndroid, Platform } from 'react-native';
import type { Permission } from 'react-native';
export default function App(): JSX.Element {
async function requestPermissions(): Promise {
if (Platform.OS !== 'android') {
return;
}
const granted = await PermissionsAndroid.requestMultiple([
PermissionsAndroid.PERMISSIONS.BLUETOOTH_CONNECT,
PermissionsAndroid.PERMISSIONS.BLUETOOTH_ADVERTISE,
PermissionsAndroid.PERMISSIONS.NEARBY_WIFI_DEVICES,
PermissionsAndroid.PERMISSIONS.BLUETOOTH_SCAN,
]);
Object.entries(granted).forEach(([permission, result]: [string, string]) => {
if (result === PermissionsAndroid.RESULTS.GRANTED) {
console.log(`${permission} granted`);
} else {
console.log(`${permission} denied`);
}
});
}
useEffect(() => {
requestPermissions();
}, []);
}
```
## Setting Up Configuration & Authentication
Configure your Ditto instance by creating a config object and opening Ditto with it.
### Server Mode with Authentication
For applications that need to sync with Ditto's cloud infrastructure:
```javascript JavaScript theme={null}
import { Ditto, DittoConfig, Authenticator } from '@dittolive/ditto';
// Create configuration
const databaseId = 'REPLACE_ME_WITH_YOUR_DATABASE_ID';
const connectConfig = {
mode: 'server',
// Copy the URL from the Ditto Portal (Connect via SDK)
url: 'REPLACE_ME_WITH_YOUR_URL',
};
const config = new DittoConfig(databaseId, connectConfig);
// Open Ditto with the configuration
const ditto = await Ditto.open(config);
// Set up token refresh handler
await ditto.auth.setExpirationHandler(async (ditto, timeUntilExpiration) => {
console.log('Token expiring soon:', timeUntilExpiration);
if (ditto.auth.loginSupported) {
const result = await ditto.auth.login('YOUR_TOKEN', Authenticator.DEVELOPMENT_PROVIDER);
if (result.error) {
console.error('Re-authentication failed:', result.error);
}
}
});
```
```typescript TypeScript theme={null}
import { Ditto, DittoConfig, Authenticator } from '@dittolive/ditto';
// Create configuration
const databaseId: string = 'REPLACE_ME_WITH_YOUR_DATABASE_ID';
const connectConfig = {
mode: 'server' as const,
// Copy the URL from the Ditto Portal (Connect via SDK)
url: 'REPLACE_ME_WITH_YOUR_URL',
};
const config: DittoConfig = new DittoConfig(databaseId, connectConfig);
// Open Ditto with the configuration
const ditto: Ditto = await Ditto.open(config);
// Set up token refresh handler
await ditto.auth.setExpirationHandler(async (ditto: Ditto, timeUntilExpiration: number) => {
console.log('Token expiring soon:', timeUntilExpiration);
if (ditto.auth.loginSupported) {
const result = await ditto.auth.login('YOUR_TOKEN', Authenticator.DEVELOPMENT_PROVIDER);
if (result.error) {
console.error('Re-authentication failed:', result.error);
}
}
});
```
### Local Only Mode (No Internet)
For offline-only applications that only sync peer-to-peer:
```javascript JavaScript theme={null}
import { Ditto, DittoConfig } from '@dittolive/ditto';
const databaseId = 'REPLACE_ME_WITH_YOUR_DATABASE_ID';
const connectConfig = {
mode: 'smallPeersOnly',
};
const config = new DittoConfig(databaseId, connectConfig);
const ditto = await Ditto.open(config);
```
```typescript TypeScript theme={null}
import { Ditto, DittoConfig } from '@dittolive/ditto';
const databaseId: string = 'REPLACE_ME_WITH_YOUR_DATABASE_ID';
const connectConfig = {
mode: 'smallPeersOnly' as const,
};
const config: DittoConfig = new DittoConfig(databaseId, connectConfig);
const ditto: Ditto = await Ditto.open(config);
```
## Setting Transport Configurations
Using `updateTransportConfig`, do the following to set up transport configurations in your app:
Configure peer-to-peer transport settings so that all desired transport types available on the end-user device are available to Ditto.
Specify how you want Ditto to handle which transports to sync data across the mesh.
```javascript JS Automatic theme={null}
ditto.updateTransportConfig((transportsConfig) => {
// For React Native apps, use setAvailablePeerToPeerEnabled to automatically
// enable all transports that are available on the current platform
transportsConfig.setAvailablePeerToPeerEnabled(true);
});
```
```typescript TS Automatic theme={null}
import { TransportConfig } from '@dittolive/ditto';
ditto.updateTransportConfig((transportsConfig: TransportConfig): void => {
// For React Native apps, use setAvailablePeerToPeerEnabled to automatically
// enable all transports that are available on the current platform
transportsConfig.setAvailablePeerToPeerEnabled(true);
});
```
```javascript JS Manual theme={null}
import {Platform} from 'react-native';
// ... Ditto init logic
ditto.updateTransportConfig((transportsConfig) => {
transportsConfig.peerToPeer.bluetoothLE.isEnabled = true;
transportsConfig.peerToPeer.lan.isEnabled = true;
transportsConfig.peerToPeer.lan.isMdnsEnabled = true;
// Apple Wireless Direct Link is available on iOS and macOS
if (Platform.OS === 'ios' || Platform.OS === 'macos') {
transportsConfig.peerToPeer.awdl.isEnabled = true;
}
// WiFi Aware is available on Android
if (Platform.OS === 'android') {
transportsConfig.peerToPeer.wifiAware.isEnabled = true;
}
})
```
```typescript TS Manual theme={null}
import { Platform } from 'react-native';
import { TransportConfig } from '@dittolive/ditto';
// ... Ditto init logic
ditto.updateTransportConfig((transportsConfig: TransportConfig): void => {
transportsConfig.peerToPeer.bluetoothLE.isEnabled = true;
transportsConfig.peerToPeer.lan.isEnabled = true;
transportsConfig.peerToPeer.lan.isMdnsEnabled = true;
// Apple Wireless Direct Link is available on iOS and macOS
if (Platform.OS === 'ios' || Platform.OS === 'macos') {
transportsConfig.peerToPeer.awdl.isEnabled = true;
}
// WiFi Aware is available on Android
if (Platform.OS === 'android') {
transportsConfig.peerToPeer.wifiAware.isEnabled = true;
}
});
```
## Constructing Sync Subscription Logic
Create the logic that performs sync and data operations in your app, including registering subscriptions, executing store operations, and observing changes in the given collection.
For example, the following snippet defines a document object (`document`), creates a subscription for the `Cars` collection, executes database operations and logs the results, registers an observer for watching changes in the `Cars` collection:
```javascript JavaScript theme={null}
// ... Ditto init logic
ditto.sync.registerSubscription(`SELECT * FROM cars`);
const document = {
id: 987654,
_id: 123131,
model: "CX-5",
make: "Mazda",
color: "blue",
};
const queryResult = await ditto.store.execute(
"INSERT INTO cars VALUES (:document) ON ID CONFLICT DO UPDATE",
{ document }
);
console.log(queryResult.items.map((item) => item.value));
console.log(
"mutated",
queryResult.mutatedDocumentIDs().map((docId) => docId.value)
);
ditto.store.registerObserver(`SELECT * FROM cars`, (response) => {
const parsedDocuments = response.items.map((doc) => {
return doc.value;
});
// save state or other use cases
});
```
```typescript TypeScript theme={null}
import { SyncSubscription, QueryResult, StoreObserver, QueryResultItem } from '@dittolive/ditto';
// ... Ditto init logic
interface Car {
id: number;
_id: number;
model: string;
make: string;
color: string;
}
const subscription: SyncSubscription = ditto.sync.registerSubscription(`SELECT * FROM cars`);
const document: Car = {
id: 987654,
_id: 123131,
model: "CX-5",
make: "Mazda",
color: "blue",
};
const queryResult: QueryResult = await ditto.store.execute(
"INSERT INTO cars VALUES (:document) ON ID CONFLICT DO UPDATE",
{ document }
);
console.log(queryResult.items.map((item: QueryResultItem) => item.value));
console.log(
"mutated",
queryResult.mutatedDocumentIDs().map((docId) => docId.value)
);
const observer: StoreObserver = ditto.store.registerObserver(`SELECT * FROM cars`, (response: QueryResult) => {
const parsedDocuments: Car[] = response.items.map((doc: QueryResultItem) => {
return doc.value as Car;
});
// save state or other use cases
});
```
## Starting the Sync Process
To start syncing with other peers in the mesh:
```javascript JavaScript theme={null}
ditto.sync.start();
```
```typescript TypeScript theme={null}
ditto.sync.start();
```
## Setting Up Presence
Monitor remote peers in the logs or using Ditto’s Presence Viewer app. For more information, see the blog post “[An explanation of the Ditto Presence Viewer.](https://www.ditto.com/blog/ditto-presence-viewer)”
To set up presence observations:
```javascript JavaScript theme={null}
// This closure is called every time the mesh of
// connected Ditto peers changes:
ditto.presence.observe((graph) => {
console.log('Peers: ', graph.remotePeers);
});
```
```typescript TypeScript theme={null}
import { PresenceGraph, PresenceObserver } from '@dittolive/ditto';
// This closure is called every time the mesh of
// connected Ditto peers changes:
const observer: PresenceObserver = ditto.presence.observe((graph: PresenceGraph) => {
console.log('Peers: ', graph.remotePeers);
});
```
## Setting Logs to Debug Level
Capture database debug logs by setting the Ditto log level to Debug mode. That way, any potential issues are tracked.
To set the minimum log level to `Debug`:
```javascript JavaScript theme={null}
import {Logger} from '@dittolive/ditto';
// ...
Logger.minimumLogLevel = 'Debug';
```
```typescript TypeScript theme={null}
import { Logger, LogLevel } from '@dittolive/ditto';
// ...
Logger.minimumLogLevel = 'Debug' as LogLevel;
```
## Declaring a Foreground Service (Android Only)
A [foreground service](https://developer.android.com/develop/background-work/services/fgs) allows your app to continue syncing data with Ditto while running in the background. A foreground service is not required to use Ditto, but without it your app will stop syncing whenever it is in the background.
To declare the foreground service, add the following to your `AndroidManifest.xml`:
```xml theme={null}
```
Make sure you customize the service metadata--it will be displayed to the user in the foreground service notification. Note that your `small_app_icon` drawable must be monochrome white.
The foreground service will be automatically started and stopped on `startSync()` and `stopSync()`, respectively.
## Known issues
1. [React Native's Fast Refresh](https://reactnative.dev/docs/fast-refresh) will throw an error with the current Ditto architecture, insisting you provide a different persistence directory name. Currently, no workaround is available; however, developers can disable Fast Refresh to avoid this issue. Our team is actively working on a fix, and we appreciate your patience as we address this challenge.