> ## Documentation Index
> Fetch the complete documentation index at: https://docs.ditto.live/llms.txt
> Use this file to discover all available pages before exploring further.
# Swift
> You can integrate the Ditto SDK into Swift projects to develop native apps for Apple iOS and macOS platforms.
To install the Ditto SDK and start syncing offline:
Confirm that you meet the minimum requirements. ([Prerequisites](#prerequisites))
Install the necessary dependencies. ([Installing Package Dependencies](#installing-package-dependencies))
Set up your app permissions. ([Configuring Permissions](#configuring-permissions))
Authenticate with Ditto Server and then start syncing offline. ([Integrating and Initializing Sync](#integrating-and-initializing-sync))
# Prerequisites
Following are the minimum requirements that must be met before attempting to install Ditto:
* iOS version 15.0 or later
* Mac Catalyst 15.0 or later
* macOS (AppKit) version 12.0 or later
# Installing Package Dependencies
Using Xcode, add the necessary dependencies:
Click **File**, and then select **Add Package Dependencies...** from the menu.
In the modal that appears:
1. Copy-paste the following URL into the search box in the upper-right corner: [https://github.com/getditto/DittoSwiftPackage](https://github.com/getditto/DittoSwiftPackage "https://github.com/getditto/DittoSwiftPackage")
2. Select **dittoswiftpackage** from the list.
3. Click **Dependency Rule** and select the version of Ditto you want to use (see [Developing for Production](#developing-for-production)).
4. Click **Add Package**.
For more information, see the official Apple documentation > [Adding package dependencies to your app](https://developer.apple.com/documentation/xcode/adding-package-dependencies-to-your-app#3512138 "Adding package dependencies to your app").
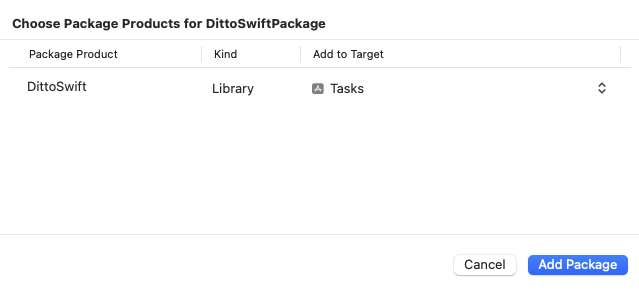
From the **Choose Package Products for DittoSwiftPackage** modal:
1. Click **Add to Target** and select your app from the list.
2. Click **Add Package**.
 ## Developing for Production
To install the latest production release of the Ditto SDK for Swift:
Click the **Dependency Rule** dropdown menu and select **Up to Next Major Version** from the list.
In the field on the right, set the version to the latest DittoSwift version:
(Please check the latest version in [Release Notes](https://docs.ditto.live/sdk/latest/release-notes/swift))
## Developing for Production
To install the latest production release of the Ditto SDK for Swift:
Click the **Dependency Rule** dropdown menu and select **Up to Next Major Version** from the list.
In the field on the right, set the version to the latest DittoSwift version:
(Please check the latest version in [Release Notes](https://docs.ditto.live/sdk/latest/release-notes/swift))
 # Configuring Permissions
Once you've added Ditto SDK package dependencies:
Configure your project's Info.plist file to ensure the necessary permissions for Bluetooth Low Energy (LE) and local network services are included. ([Ensuring Privacy Compliance](#ensuring-privacy-compliance))
If enabling the Data Protection entitlement, allow access after your end users have unlocked their device for the first time after a system restart. ([Setting Protection Entitlement](#setting-protection-entitlement))
## Ensuring Privacy Compliance
Configure your app for compliance with Apple's guidelines for iOS permissions by doing the following. For more information, see the official Apple documentation for [Privacy](https://developer.apple.com/design/human-interface-guidelines/privacy "Privacy").
From Xcode, add a new **Custom iOS Target Properties** entry:
1. From the left navigator area, click your project.
2. In the editor that appears, click **Info** tab.
3. Right-click any row in the list, and then select **Add Row** from the menu.
For instructions on configuring permissions for your app, see [Cloud Authentication](../auth-and-authorization/cloud-authentication).
# Configuring Permissions
Once you've added Ditto SDK package dependencies:
Configure your project's Info.plist file to ensure the necessary permissions for Bluetooth Low Energy (LE) and local network services are included. ([Ensuring Privacy Compliance](#ensuring-privacy-compliance))
If enabling the Data Protection entitlement, allow access after your end users have unlocked their device for the first time after a system restart. ([Setting Protection Entitlement](#setting-protection-entitlement))
## Ensuring Privacy Compliance
Configure your app for compliance with Apple's guidelines for iOS permissions by doing the following. For more information, see the official Apple documentation for [Privacy](https://developer.apple.com/design/human-interface-guidelines/privacy "Privacy").
From Xcode, add a new **Custom iOS Target Properties** entry:
1. From the left navigator area, click your project.
2. In the editor that appears, click **Info** tab.
3. Right-click any row in the list, and then select **Add Row** from the menu.
For instructions on configuring permissions for your app, see [Cloud Authentication](../auth-and-authorization/cloud-authentication).
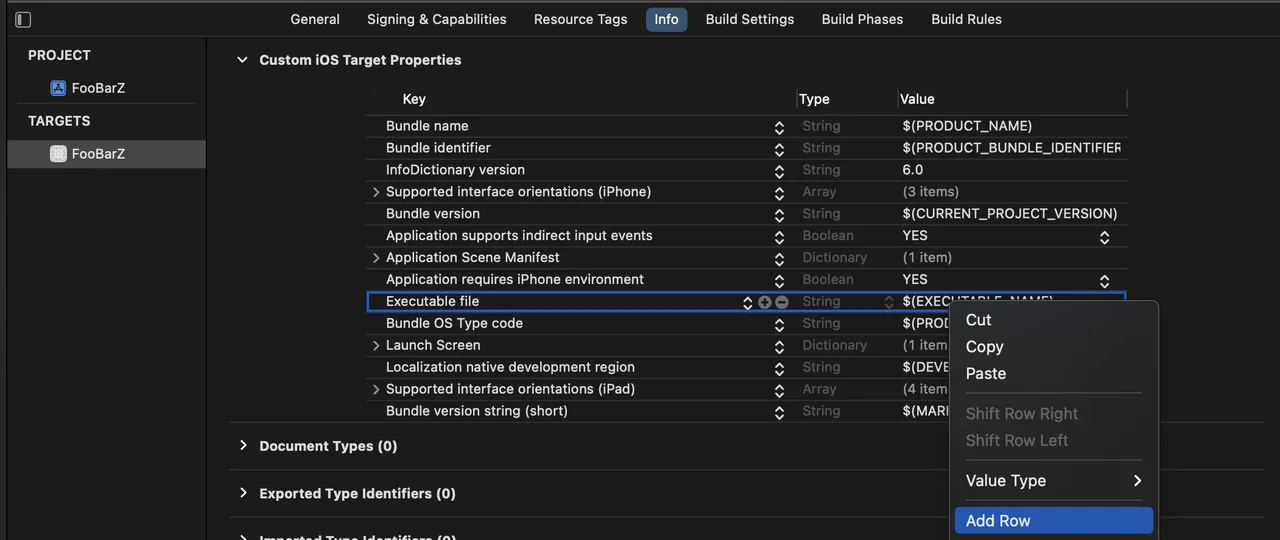 From your project's Info.plistfile, add the following key-value pairs, which display as dismissable prompts to your end users explaining why the app requires certain permissions.
```swift From Info Tab theme={null}
Key: NSBluetoothAlwaysUsageDescription
Type: String
Value: Uses Bluetooth to connect and sync with nearby devices
Key: NSBluetoothPeripheralUsageDescription
Type: String
Value: Uses Bluetooth to connect and sync with nearby devices
Key: NSLocalNetworkUsageDescription
Type: String
Value: Uses WiFi to connect and sync with nearby devices
Key: NSBonjourServices
Type: Array
Value: Item0: "_http-alt._tcp." (String)
```
```xml From Source Code theme={null}
NSBluetoothAlwaysUsageDescription
Uses Bluetooth to connect and sync with nearby devices
NSBluetoothPeripheralUsageDescription
Uses Bluetooth to connect and sync with nearby devices
NSLocalNetworkUsageDescription
Uses WiFi to connect and sync with nearby devices
NSBonjourServices
_http-alt._tcp.
```
If your end users prefer a language other than English, replace each default string assigned to Value with their language equivalents.
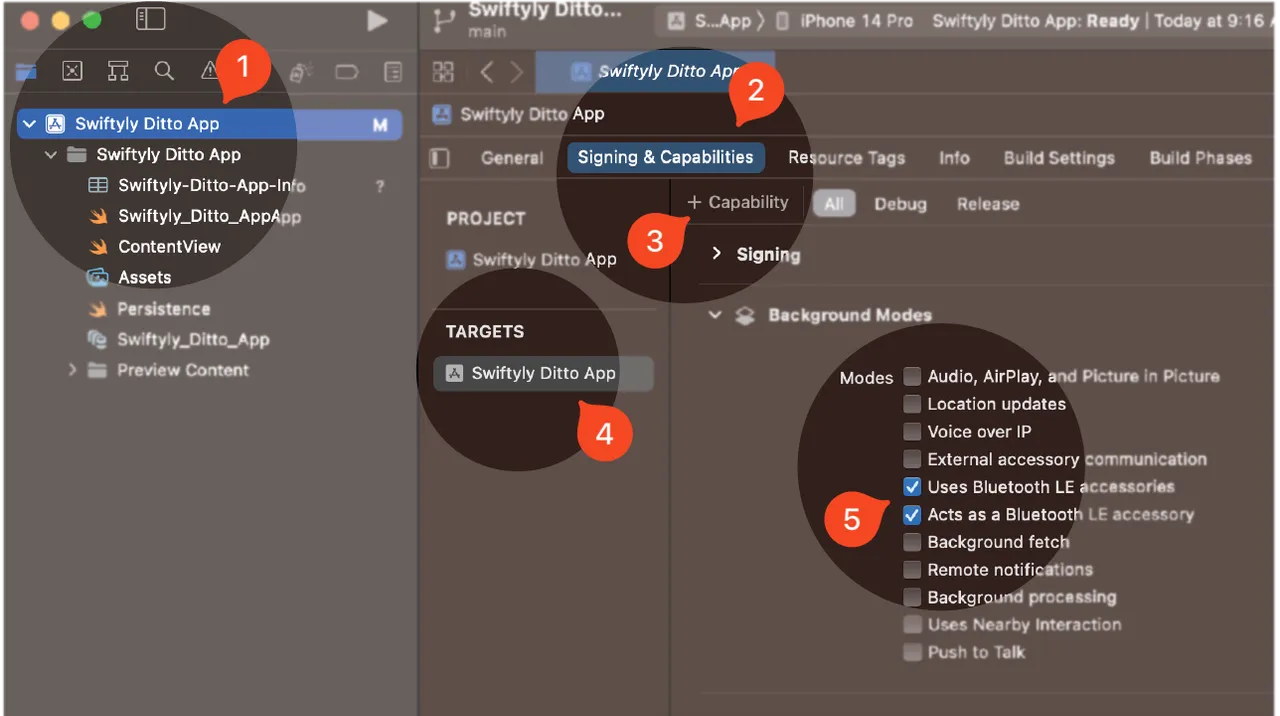
From Xcode, ensure your app continues to sync while it runs in the background, as well as when the end-user device is locked by enabling **Bluetooth Background Modes**:
1. From the left navigator area, click your project.
2. Click **Signing & Capabilities**.
3. Click **+ Capability** and then, from the modal that appears, search and select **Background Modes**.
4. From **TARGETS**, select your app from the list.
5. From **Background Modes**, click to select the following:
* **Uses Bluetooth LE accessories**
* **Acts as a Bluetooth LE accessory**
From your project's Info.plistfile, add the following key-value pairs, which display as dismissable prompts to your end users explaining why the app requires certain permissions.
```swift From Info Tab theme={null}
Key: NSBluetoothAlwaysUsageDescription
Type: String
Value: Uses Bluetooth to connect and sync with nearby devices
Key: NSBluetoothPeripheralUsageDescription
Type: String
Value: Uses Bluetooth to connect and sync with nearby devices
Key: NSLocalNetworkUsageDescription
Type: String
Value: Uses WiFi to connect and sync with nearby devices
Key: NSBonjourServices
Type: Array
Value: Item0: "_http-alt._tcp." (String)
```
```xml From Source Code theme={null}
NSBluetoothAlwaysUsageDescription
Uses Bluetooth to connect and sync with nearby devices
NSBluetoothPeripheralUsageDescription
Uses Bluetooth to connect and sync with nearby devices
NSLocalNetworkUsageDescription
Uses WiFi to connect and sync with nearby devices
NSBonjourServices
_http-alt._tcp.
```
If your end users prefer a language other than English, replace each default string assigned to Value with their language equivalents.
From Xcode, ensure your app continues to sync while it runs in the background, as well as when the end-user device is locked by enabling **Bluetooth Background Modes**:
1. From the left navigator area, click your project.
2. Click **Signing & Capabilities**.
3. Click **+ Capability** and then, from the modal that appears, search and select **Background Modes**.
4. From **TARGETS**, select your app from the list.
5. From **Background Modes**, click to select the following:
* **Uses Bluetooth LE accessories**
* **Acts as a Bluetooth LE accessory**
 ## Setting Protection Entitlement
If enabling the Data Protection entitlement, allow access after the end user has unlocked their device for the first time after a system restart by setting the entitlement to NSFileProtectionCompleteUntilFirstUserAuthentication.
For more information, see the official Apple documentation for [Data Protection Entitlement](https://developer.apple.com/documentation/bundleresources/entitlements/com_apple_developer_default-data-protection).
# Integrating and Initializing Sync
Once you've set up your environment, import the Ditto SDK in your codebase and obtain your access credentials.
Unless you have a specialized use case, such as a government app, you must connect to the internet at least once before you can sync offline with other peers.
From the top-most scope of your app's codebase, add the following to set up authentication and start syncing offline.
Replace YOUR\_APP\_ID and YOUR\_PLAYGROUND\_TOKEN with your access credentials available from the portal.
For instructions on how to obtain your access credentials, see [Getting SDK Connection Details](/cloud/portal/getting-sdk-connection-details)
```swift Swift theme={null}
import DittoSwift
import Foundation // v5 no longer re-exports Foundation; needed for URL
// Create a DittoConfig with your database ID.
// Copy the "URL" and "Database ID" from the Ditto Portal (Connect via SDK).
let config = DittoConfig(
databaseID: "REPLACE_ME_WITH_YOUR_DATABASE_ID",
connect: .server(url: URL(string: "REPLACE_ME_WITH_YOUR_URL")!)
)
// Open Ditto with the configuration
let ditto = try await Ditto.open(config: config)
// Set up authentication expiration handler
ditto.auth?.expirationHandler = { ditto, secondsRemaining in
ditto.auth?.login(token: "YOUR_PLAYGROUND_TOKEN", provider: .development) { clientInfo, error in
if let error = error {
print("Authentication error: \(error)")
} else {
print("Authentication successful")
}
}
}
// Start syncing
do {
try ditto.sync.start()
} catch {
print("Error starting sync: \(error.localizedDescription)")
}
```
# Using crash reporters in iOS apps
Integrate the crash reporter SDK into your app, following their documentation.
Trigger a panic and check that it was registered in your crash reporter. You can use the `DittoExperimental.triggerTestPanic()` function to do so. At this point, without native symbols, the crash will be unreadable. If you are not seeing any crashes in the reporter, check that you have integrated its components correctly.
For release builds, you can obtain the `dsym` files from Xcode. They are included in the `.xcarchive` file. Navigate to `Xcode → Window → Organizer → Archives → (Right click on a specific build) → Show in Finder → Show Package Contents → dSYMs Folder`. Here you can find all the required files:
1. Your own app's symbol file, such as `MyApp.app.dSYM`
2. The Ditto `DittoObjC.framework.dSYM` and `DittoSwift.framework.dSYM` files.
Check your crash reporter's documentation for how to do this. For example Sentry provides a CLI tool.
Trigger a new panic and notice that the crash is now symbolicated by the reporting framework.
## Setting Protection Entitlement
If enabling the Data Protection entitlement, allow access after the end user has unlocked their device for the first time after a system restart by setting the entitlement to NSFileProtectionCompleteUntilFirstUserAuthentication.
For more information, see the official Apple documentation for [Data Protection Entitlement](https://developer.apple.com/documentation/bundleresources/entitlements/com_apple_developer_default-data-protection).
# Integrating and Initializing Sync
Once you've set up your environment, import the Ditto SDK in your codebase and obtain your access credentials.
Unless you have a specialized use case, such as a government app, you must connect to the internet at least once before you can sync offline with other peers.
From the top-most scope of your app's codebase, add the following to set up authentication and start syncing offline.
Replace YOUR\_APP\_ID and YOUR\_PLAYGROUND\_TOKEN with your access credentials available from the portal.
For instructions on how to obtain your access credentials, see [Getting SDK Connection Details](/cloud/portal/getting-sdk-connection-details)
```swift Swift theme={null}
import DittoSwift
import Foundation // v5 no longer re-exports Foundation; needed for URL
// Create a DittoConfig with your database ID.
// Copy the "URL" and "Database ID" from the Ditto Portal (Connect via SDK).
let config = DittoConfig(
databaseID: "REPLACE_ME_WITH_YOUR_DATABASE_ID",
connect: .server(url: URL(string: "REPLACE_ME_WITH_YOUR_URL")!)
)
// Open Ditto with the configuration
let ditto = try await Ditto.open(config: config)
// Set up authentication expiration handler
ditto.auth?.expirationHandler = { ditto, secondsRemaining in
ditto.auth?.login(token: "YOUR_PLAYGROUND_TOKEN", provider: .development) { clientInfo, error in
if let error = error {
print("Authentication error: \(error)")
} else {
print("Authentication successful")
}
}
}
// Start syncing
do {
try ditto.sync.start()
} catch {
print("Error starting sync: \(error.localizedDescription)")
}
```
# Using crash reporters in iOS apps
Integrate the crash reporter SDK into your app, following their documentation.
Trigger a panic and check that it was registered in your crash reporter. You can use the `DittoExperimental.triggerTestPanic()` function to do so. At this point, without native symbols, the crash will be unreadable. If you are not seeing any crashes in the reporter, check that you have integrated its components correctly.
For release builds, you can obtain the `dsym` files from Xcode. They are included in the `.xcarchive` file. Navigate to `Xcode → Window → Organizer → Archives → (Right click on a specific build) → Show in Finder → Show Package Contents → dSYMs Folder`. Here you can find all the required files:
1. Your own app's symbol file, such as `MyApp.app.dSYM`
2. The Ditto `DittoObjC.framework.dSYM` and `DittoSwift.framework.dSYM` files.
Check your crash reporter's documentation for how to do this. For example Sentry provides a CLI tool.
Trigger a new panic and notice that the crash is now symbolicated by the reporting framework.