Use this file to discover all available pages before exploring further.
Learn more about Ditto’s authentication methods in Authentication and
Authorization.This section will require knowledge of writing HTTP webhooks. This example is
written in JavaScript (NodeJS with an Express-like API), however you can use any framework or language of your
choosing.The authentication webhook needs to handle an HTTP POST request. Each client
that will need to authenticate will send a payload to this webhook. The
following section requires that you have knowledge of writing server-side HTTP
endpoints and responding with a JSON payload.
You can use this
example
webhook to test your application. However, you should use your own webhook in
production. The example simply authenticates all requests for 7 days of offline
usage.
When your client device wants to authenticate using your webhook, your webhook will receive an HTTP post with a JSON payload that looks like:
{ "databaseID": "YOUR_DATABASE_ID_HERE", "version": "1", "provider": "my-auth", // this is the "Name" of the "Authentication Webhook" "token": "eyJhbGciOiJI..." // this is what each device will send to authenticate}
Your server can introspect these values by parsing out the request body:
let express = require('express')let cors = require('cors')let body = require('body-parser')let app = express()app.use(cors())app.use(body.json())let app = express()app.post('/', (req, res) => { const databaseID = req.body.databaseID // or appID in legacy const provider = req.body.provider const token = req.body.token})
Generally, you will want to check the token for some sort of validity. Let’s
assume you have some sort of library or logic to parse and validate the token is
for a specific user. You can also use the clientInfo key in your JSON response
to pass information back to client.
v1
app.post('/', async (req, res) => { const token = req.body.token; try { // The token that your webhook receives from ditto is always a string let parsedToken = JSON.parse(token) let payload = getDittoPermissions(parsedToken) res.json(payload) } catch (err) { res.json({ "authenticate": err, "clientInfo": err.message }) }})
As a simple example, let’s grant full read & write permissions to all collections and all documents.
Now, deploy your webhook. The portal will attempt to reach this webhook. That
means you must deploy it somewhere that this HTTP request is accessible.
Please be sure that this endpoint is not behind a firewall or VPN. If you cannot get around this requirement contact us.
Declare your Webhook as Ditto Authentication Provider
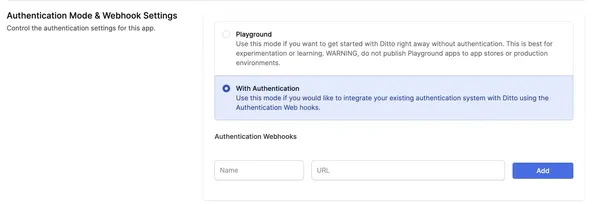
To enable Authentication, you need to declare your deployed webhook as a Ditto Authentication Provider through the Ditto Portal.Open your database in the portal and find
the Authentication Mode & Webhook Settings section. Ensure
that “Authentication” is turned on:
Below, a section called Authentication Providers will be editable. Once your
Webhook Endpoint is deployed and ready, you ca add Name and URL.
Name: Provide a unique name for your webhook provider. This name will be used by the Ditto SDK to authenticate clients.
URL: The URL is the fully qualified URL of the webhook that you deploy yourself starting with https://.
Once configured, you should see a authentication provider that looks like this in your portal database settings:
Once you have deployed your webhook and registered it as an authentication provider in the
portal, you can use the Ditto SDK to authenticate your clients.In v5, authentication is configured using DittoConfig to connect to your server, and you set up an expirationHandler that is called when authentication credentials are about to expire. Within this handler, you call ditto.auth.login(token, provider) to refresh authentication.Use the provider name you set in the portal and the token that your
authentication webhook expects. The token is typically a JWT or some other
authentication token that your webhook can validate.
// Your Ditto server URLlet providerName = "YOUR_PROVIDER_NAME"let serverURL = URL(string: "REPLACE_ME_WITH_YOUR_URL")!let config = DittoConfig( databaseID: "REPLACE_ME_WITH_YOUR_DATABASE_ID", // This was "appID" in v4 connect: .server(url: serverURL), // This was "Custom Auth URL" in v4)let ditto = try await Ditto.open(config: config)// Set up authentication expiration handler (required for server connections)ditto.auth?.expirationHandler = { [weak self] ditto, secondsRemaining in // Get token from your authentication system let token = await getMyToken() ditto.auth?.login( token: token, provider: providerName ) { clientInfo, error in if let error = error { print("Authentication failed: \(error)") } else { print("Authentication successful") } }}try ditto.sync.start()