

This content is for SDK V4. For the latest version, see the V5 documentation.
API
To see fully working examples, see the code samples on GitHub.Creating Your Client
To start with online authentication you need to use the onlineWithAuthentication identity type when creating your Ditto client. This identity type requires you to provide two callbacks to handle authentication requests from Ditto:- authenticationRequired: Called when Ditto initially needs to authenticate
- authenticationExpiringSoon: Called when Ditto needs to refresh the authentication token
- clientInfo: A JSON object provided by your webhook.
- error: If the login attempt failed, this will contain an error object with details about the failure. If the login was successful, this will be null.
The method to access the values passed to the callback differs between languages. See the code examples below for details.
In the examples above
accessToken is a placeholder for the actual token sent to your webhook.
Depending on your webhook implementation you may need to refresh this token periodically.Login
Login takes two parameters:- Token: This can be any string value. Most auth services use a JWT (JSON Web Token), but you can send any token you want from the client. For example, during testing you may want to create a secret code for development use. This string will be sent in a POST request to the HTTP route.
- Provider: This must be a string value matching the name of one of your configured authentication webhooks. If you have multiple authentication webhooks, you can select which webhook your application should use by changing the provider.

When should you call ditto.auth.login?
Along with the callbacks above, you can also call ditto.auth.login manually. This is useful if you know specific times when your app will be online. For an example implementation of authentication for Android, see the Ditto open-source demo chat app’s “authentication” branch in the getditto GitHub repository.Logout
Logout will stop sync, shut down all replication sessions, and remove any cached authentication credentials. Note that this does not remove any data from the store. If you wish to delete data from the store then use the optional cleanupFn parameter to perform any required cleanup. The cleanupFn is an optional function that will be called with the relevant Ditto instance as the sole argument that allows you to perform any required cleanup of the store as part of the logout process.Tutorial
- This section will require knowledge of writing server-side HTTP endpoints and handlers. The server side sample code is written in JavaScript (NodeJS with an Express-like API), however you can use any framework or language of your choosing.
- We will use Auth0 in this tutorial. But you can use any third-party identity provider. Each app can use multiple identity providers.
- In this tutorial, you’ll build a simple application so users can log in with a third-party provider using Auth0. We assume that you have already completed the Auth0 tutorial on their documentation before starting this tutorial.
- For the full application code in JavaScript and Swift, see the code samples on GitHub.
Configure Ditto
To use an “Online With Authentication” identity, go to your app in the portal and find the Authentication Mode & Webhook Settings section. Ensure that “With Authentication” is selected like so: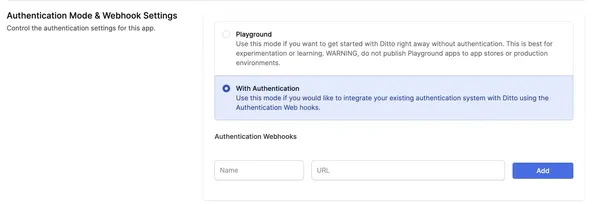
- Provide a unique name.
- The URL parameter is the fully qualified URL of the webhook that you deploy yourself. Please include https:// at the beginning of your URL.

Configure Auth0
The second step is to configure Auth0. Follow these steps:- Create a new Auth0 application.
- Configure the allowed callbacks and origins for your application. Make sure to add the callback URL for your application.
- Configure the allowed grant types for your application. For this tutorial, we will use the “Authorization Code” grant type.
- Create a new API in Auth0. This will represent the API that your application will access.
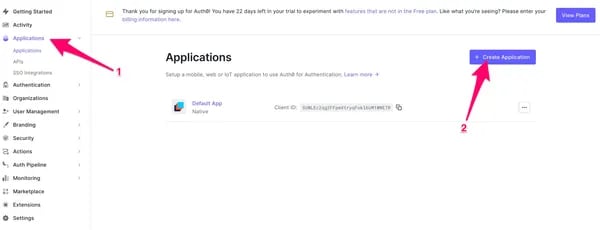
- In the menu on the left side of the Auth0 dashboard, click on Applications. This will expand the Applications menu. Select the first item in that menu, which also has the name Applications. You will now be on the Applications page. It lists all the applications that you have registered so that Auth0 can handle their login/logout processes.
- Create a new registration for your app. Do this by clicking the Create application button near the top right of the page.
- Domain
- Client ID
References
Auth0 Tutorial Auth0 Website - Android Getting Started / OnboardingIntegrating Auth0 with Ditto
Assuming you have a login button in the HTML:JS
JS
The provider name given to the Ditto Client must match a provider name in the portal (e.g., replit-auth). If you have multiple providers, ensure you specify the provider name that you want your app to use.
JS
JSX
JS
JS
JS
JS
Server
The authentication webhook needs to handle an HTTP POST request. Each client that will need to authenticate will send a payload to this webhook. The following section requires that you have knowledge of writing server side HTTP endpoints and responding with a JSON payload. Code samples of server side code are written with a NodeJS / Express syntax. You can use any language or framework on the server side.Incoming POST body
When your client device wants to authenticate using your webhook, your server will receive an HTTP post with a JSON payload that looks like:JSON
JS
Response body
Your webhook must respond with a JSON payload that tells Ditto Cloud whether to authenticate the client and, if so, what permissions to grant and for how long. A single response object carries both the authentication decision (authenticated) and the authorization detail (permissions). The full schema Ditto Cloud expects is below.
JSON Schema
JSON Schema
JS
JS
Deploy your server
Now, the portal will attempt to reach this server. That means you must deploy it somewhere that this HTTP request is accessible. For testing, you can use a quick-deploy service such as Glitch.Please be sure that this endpoint is not behind a firewall or VPN. If you cannot get around this requirement contact us.