Example Webhook
You can use this example webhook to test your application. However, you should use your own webhook in production. The example simply authenticates all requests for 7 days of offline usage.Building your Authentication Webhook
Incoming POST body
When your client device wants to authenticate using your webhook, your webhook will receive an HTTP post with a JSON payload that looks like:Response body
Your webhook must respond with a JSON payload that tells Ditto Cloud whether to authenticate the client and, if so, what permissions to grant and for how long. A single response object carries both the authentication decision (authenticated) and the authorization detail (permissions). The full schema Ditto Cloud expects is below.
JSON Schema
JSON Schema
v1
Include
"version": "1" in your response payload. It is required for DQL query-based permissions (queriesByCollection). Responses that omit version are treated as legacy-format responses and will not evaluate DQL permission queries.JS
Receiving the token in a request header (BYOC only)
By default, Ditto sends the authenticationtoken inside the JSON request body, as
shown in Incoming POST body.
Users with a BYOC (Bring Your Own Cloud) Ditto Cloud deployment can instead request
that Ditto send the token in an HTTP request header, with a name of your choosing.
This may be useful to fit an existing API gateway or reverse-proxy convention that expects the credential in a header.
Because it is applied at the Ditto Server level, it affects every authentication webhook provider and every app deployed on that Ditto Server.
To enable this, contact Ditto support.
When this is enabled:
- Ditto sends the token as the value of an HTTP header whose name (key) you choose.
- The
tokenfield is omitted from the JSON body.
X-Auth-Token, your webhook receives:
Deploy your webhook
Now, deploy your webhook. The portal will attempt to reach this webhook. That means you must deploy it somewhere that this HTTP request is accessible.Please be sure that this endpoint is not behind a firewall or VPN. If you cannot get around this requirement contact us.
Declare your Webhook as a Ditto Authentication Provider
To enable Authentication, you need to declare your deployed webhook as a Ditto Authentication Provider through the Ditto Portal. Open your database in the portal and find the Authentication Mode & Webhook Settings section. Ensure that “Authentication” is turned on: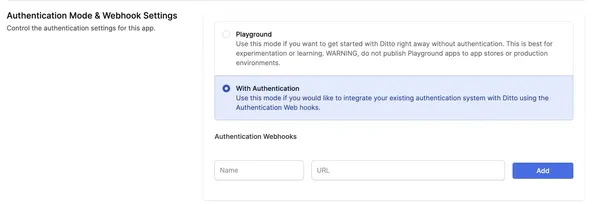
- Name: Provide a unique name for your webhook provider. This name will be used by the Ditto SDK to authenticate clients.
- URL: The URL is the fully qualified URL of the webhook that you deploy yourself starting with
https://.

SDK Authentication
Once you have deployed your webhook and registered it as an authentication provider in the portal, you can use the Ditto SDK to authenticate your clients. In v5, authentication is configured usingDittoConfig to connect to your server, and you set up an expirationHandler that is called when authentication credentials are about to expire. Within this handler, you call ditto.auth.login(token, provider) to refresh authentication.
Use the provider name you set in the portal and the token that your
authentication webhook expects. The token is typically a JWT or some other
authentication token that your webhook can validate.