

With the deprecation of Atlas Device Sync, Ditto is the recommended replacement for synchronizing edge devices with MongoDB. Refer to our Migration Guide for Atlas Device Sync for a comprehensive guide on moving from Atlas Device Sync to Ditto.
The MongoDB Connector is now generally available and is available to all paying Ditto customers.If you are interested in using the MongoDB connector, please visit the MongoDB Connector page, which has further details around requesting access.
How It Works
The MongoDB Connector is provided as a managed service, running alongside the Ditto Server that you are using for your Ditto databases. The Ditto Server is a centralized cloud datastore and synchronization engine that is analogous to the Atlas Device Sync service.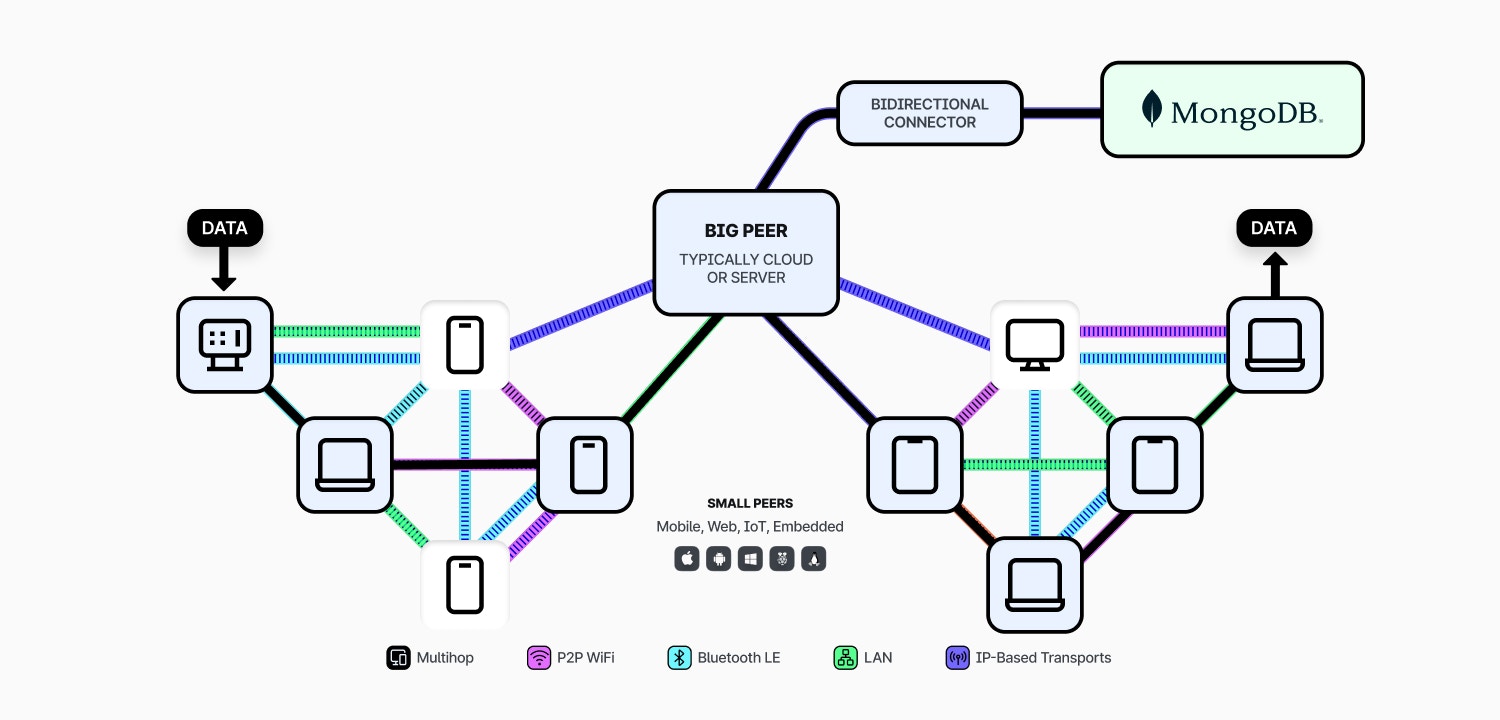
Connector Restarts and Recovery
When the MongoDB Connector service restarts — whether due to a planned update or an unexpected interruption — it resumes synchronization using saved checkpoints and MongoDB resume tokens. These mechanisms allow the connector to pick up where it left off without re-syncing the entire dataset.In connector versions prior to v1.63.2, a bug could cause the connector to write stale data from MongoDB back to Ditto during crash recovery. This issue has been resolved. If you are running an older version of the connector and experience unexpected data changes after a service restart, contact Ditto support.
Data Modelling Considerations
Both Ditto and MongoDB store their data in the form of JSON-like documents, so are a natural fit together when building applications that run on the edge. Unlike integrations with other systems that rely on synchronizing to relational forms (e.g. sqlite), you do not need to remodel your data to use Ditto and MongoDB together. However, there are a few considerations that you need to make when using Ditto.ID Mapping Between Systems
Due to security considerations in a peer-to-peer context, Ditto’s permission system (see Data Authorization) only has access to the unique and immutable ID field (_id). To use permissions effectively, most Ditto databases use objects rather than strings as their _id. These sub-fields with the _id are then often duplicated in the document’s body to facilitate POJO/DTO-like patterns in your application code. For example you may choose to model an order (in a retail system) as follows:
JSON
ObjectIds, essentially UUIDs with a time-based component; alternatively you may choose to use a single field value as the ID (e.g. orderId). It’s very rare for IDs in MongoDB to be used in the same way as within Ditto, therefore IDs likely need to be handled differently in both systems.
The MongoDB Connector automatically bridges this difference in IDs, so that both systems can converge, even if their primary keys differ. It does this through the “ID Mapping” process, based on the configuration that you provide to the connector.
There are 3 modes for the ID mapping:
- 1:1 ID (i.e. the same ID is used in both Ditto and MongoDB)
- Single Document Field
- Multiple Document Fields
1:1 ID
This mode is used if you select the “Match IDs” option, which will use the_id field in the ID mapping.
In that case the ID fields used between Ditto and MongoDB will be identical.
However, some restrictions apply here:
NULLcannot be present in the ID- Arrays cannot be present in the ID
- The ID cannot be an object
Single Document Field
This mode is used if only a single field is specified in the field mapping.You cannot use the
_id field itself in this mode.
You must only refer to top-level fields in the document, nested fields are not supported.orderId field and the following MongoDB document:
MongoDB
JSON
Multiple Document Fields
When the ID mapping contains multiple fields, like the restaurants collection in the example above, the Ditto ID will become an object with the specified fields and corresponding values from the document. Note that the Id Mapping cannot refer to the_id field itself in this case.
You cannot use the
_id field itself in this mode.
You must only refer to top-level fields in the document, nested fields are not supported.location and orderId fields and the following MongoDB document:
MongoDB
Ditto Document
ID:
MongoDB Datatypes
MongoDB stores data as BSON, which includes rich datatypes such as nativedate objects, you can read more about the datatypes available in https://www.mongodb.com/docs/manual/reference/bson-types/.
Ditto represents its data using JSON with a few key additional datatypes (e.g. integer), which does not have the full set of datatypes available in BSON. The connector will perform automatic mapping of BSON datatypes to JSON when synchronizing data from MongoDB to Ditto.
How data is mapped between JSON and BSON is dependent on whether you are using EJSON mode or not.
EJSON mode can be configured on a collection-by-collection basis.
EJSON Mode
If EJSON mode is enabled, all BSON data stored in MongoDB will be mapped to its canonical JSON representation prior to being stored in Ditto. Similarly, all data stored in Ditto is expected to be in EJSON canonical form and will be mapped to its BSON representation prior to being stored in MongoDB. This ensures that any BSON data stored in MongoDB is correctly represented in Ditto and vice versa, no matter where the data is created or modified. For example, if you have the following MongoDB BSON document:Ditto Document
As EJSON canonical form is a significantly more verbose representation of the data, you will have to write your code and queries within Ditto to expect this more complex representation. See our comprehensive guide on Working with EJSON for detailed information on querying EJSON data, performance considerations, and platform-specific code examples.
Native BSON Mapping
If EJSON mode is not enabled, the connector will perform a native mapping of BSON datatypes to JSON. This is equivalent to the EJSON relaxed mode, where any BSON datatype that is not explicitly defined in the collection definition will be mapped to a JSON object. The full set of mappings are listed below:All BSON datatypes that are not listed above will not be replicated between Ditto and MongoDB.
DQL Strict Mode
When using native BSON mapping, you can also control whether DQL strict mode is enabled for the collection, via the Enable DQL Strict Mode option when adding a collection. This setting determines how the connector represents MongoDB objects within Ditto: as Ditto maps or as registers.- Strict mode off (recommended): Objects are synchronized as maps, with scalar fields inside them stored as registers. Because each field is represented independently, the connector can synchronize a change to a single field without re-syncing the rest of the document, improving performance both at scale and over peer-to-peer connections. This also matches the default behavior of Ditto SDK 5.0 and later.
- Strict mode on: Each object is synchronized as a single register, so the entire object is replaced on every change using last-write-wins semantics.
Strict mode is always off when using EJSON mode, so the Enable DQL Strict Mode option only applies to collections using native BSON mapping.
Settable Counters
A settable counter is a special Ditto datatype for handling counts across a distributed mesh. You can designate one or more numeric fields as settable counters when adding a collection. Select the Custom document schema option, then set the Ditto type of the field toCounter. Any update to a counter field in MongoDB syncs to Ditto as a Counter SET operation. In the reverse direction, Counter values sync back to MongoDB as plain numbers. In both cases, conflicts resolve via Last-Write-Wins merge semantics.
Setting Up the Connector
To set up the connector, you first must carry out some steps within your MongoDB cluster, then configure the connector via API to launch the connector.Pre-requisites
You need to have a MongoDB cluster already set up, the minimum supported version for the connector is currently MongoDB 7.0.13 and MongoDB 8.0.0. You need to follow a number of steps to ensure that MongoDB is ready to be used with the connector.Create MongoDB Database
If your target database doesn’t currently exist, then you must first create this within MongoDB. No special configuration is required for the created database. An existing database can be used if one exists.Create MongoDB Collections
All collections you wish to synchronize with Ditto must exist within MongoDB before setting up the connector. Each of these synchronized collections must havechangeStreamPreAndPostImages set to true. This setting allows the connector to ensure causal consistency between both systems, and the connector will not start if this is not set for all collections.
When creating new collections, pass changeStreamPreAndPostImages: true to your creation command. For pre-existing collections, you can modify this configuration using collMod.
See Enable Change Stream Pre and Post Images.
For example, to edit an existing collection called orders, you can run the following command:
Create a MongoDB Database User
The connector authenticates to MongoDB using the username and password of a database user. We recommend creating a dedicated database user for the connector to use within MongoDB. At a minimum the database user will require thereadWrite permission for the specific database that you’re looking to synchronize with Ditto. See Configure MongoDB Database Users. If you are connecting to a sharded database (i.e. a mongos connection) the database user also needs to have the explicit read permission for the built-in collection collection in the config database, so it can inspect sharding configurations.
Add Ditto IPs to MongoDB Allowlist
You need to add the Ditto IP addresses to the allowlist of your MongoDB cluster to allow the connector to access the cluster correctly. The IP addresses vary depending on where your Ditto Server is deployed. You can find the specific IP addresses for your deployment in the Ditto Portal, on the MongoDB Connector page under Settings > MongoDB Connector. Add all listed IP addresses to your MongoDB Atlas allowlist. See Add IPs to MongoDB Allowlist for instructions on configuring the allowlist in MongoDB Atlas.Configuring the Connector
To get access to the MongoDB Connector UI, you’ll need to contact Ditto to have your organization enrolled.
Settings > MongoDB Connector.
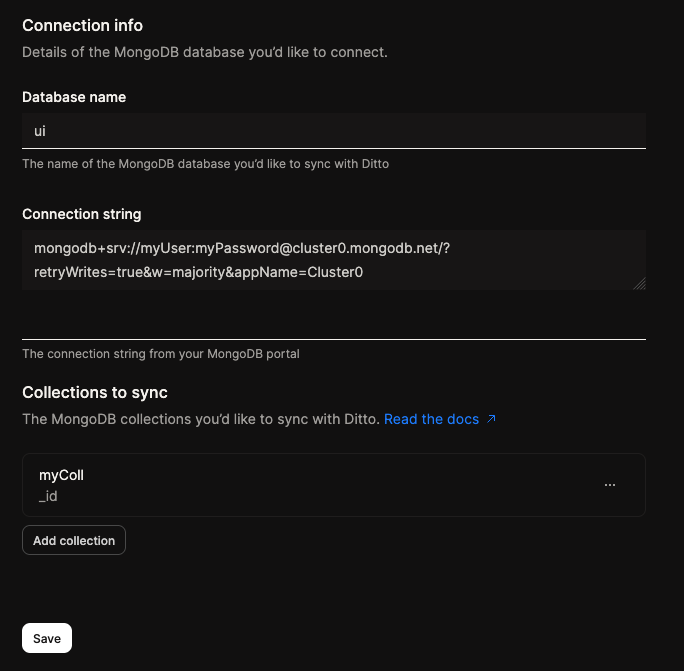
Step-by-Step Guide
1
Fill in the database field, with the MongoDB database that you wish to synchronize with Ditto.
2
Fill in the connection string field, with the connection string of the MongoDB database that you wish to synchronize with Ditto.
You can find this connection string in the MongoDB Atlas UI, under the
Connect button for your cluster, ensuring that you use the credentials of the database user that you created in the prerequisites.The connection string must be supplied in the format mongodb+srv://<username>:<password>@<cluster>.mongodb.net/.
For example to connect to the cluster with the URL my_cluster.mongodb.net, using the username my_user with a password of my_password, you would provide mongodb+srv://my_user:my_password@my_cluster.mongodb.net/.
Non-SRV-based connection strings cannot be used with the MongoDB connector.While the password is passed into the Ditto Portal as part of the connection string, it is stored securely in Ditto’s systems and is not accessible to Ditto staff.
3
Fill in the ID mapping field, with the ID mapping that you wish to use for the connector.You can add new collections to the connector by clicking the 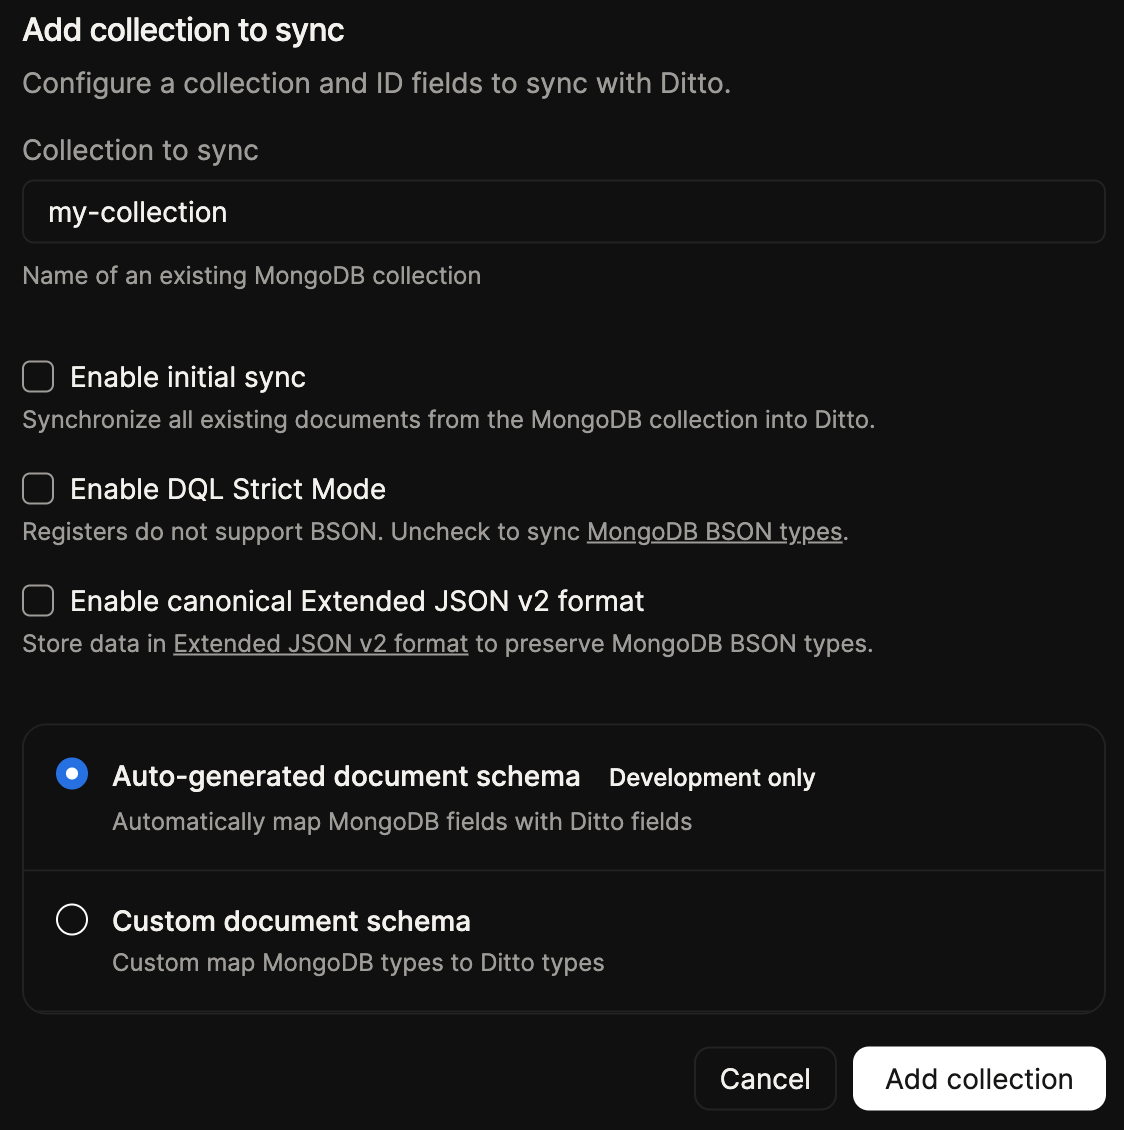
Add Collection button, which opens the Add collection to sync form. Enter the collection name, toggle initial sync, then choose how your fields are mapped to Ditto.Enabling initial sync will trigger an initial sync of the collection from MongoDB to Ditto, this is rate limited and will be done in the background to avoid affecting the performance of the connector. Once the initial sync is complete, the connector will continue to synchronize the collection on an ongoing basis via MongoDB Change Streams.For very large collections, you may opt to not rely on the Connector to perform the initial sync, and instead perform the initial sync manually via the Ditto API so that you have finer-grained control over the process.The form also exposes the Enable DQL Strict Mode and Enable canonical Extended JSON v2 format options, which control how MongoDB datatypes are represented in Ditto. See MongoDB Datatypes and DQL Strict Mode for guidance on these options.To map your fields, choose one of the document schema options:If you select Auto-generated document schema, MongoDB fields are mapped to Ditto fields automatically, and the ID fields used between Ditto and MongoDB will be identical. This option is intended for development only.ID, and set any fields you want to treat as settable counters to Counter.Add collection button to add the collection to the connector configuration, repeat this step for each collection you wish to synchronize with Ditto.4
Once all of the fields have been added, click the
Save button to create the connector.5
Once the connector has been created, you will be able to see the status of the connector in the Ditto Portal.
It will first show as
Pending while the connector is being created, then once it is ready it will show as Running.
In case of an error, the connector will show as Failed, and you will be able to see the error message in the Ditto Portal, see also Troubleshooting Connectivity.Troubleshooting Connectivity
When the connector starts up, it will perform a number of checks to ensure that it is able to connect to MongoDB and that the configuration is correct. If any of these checks fail, the connector will show asFailed, and you will be able to see a more detailed error message in the Ditto Portal.
These checks are as follows:
- Ensure that the MongoDB connection string is reachable
- Ensure that the MongoDB database user has the correct permissions
- Ensure that the MongoDB cluster has the correct IP addresses added to the allowlist (as shown in the Ditto Portal)
- Ensure that the MongoDB database exists
- Ensure that the MongoDB collections exist
- Ensure that the MongoDB collections have
changeStreamPreAndPostImagesset totrue - Ensure that it can create all of the necessary metadata collections
changeStreamPreAndPostImages Not Enabled
Symptom: The connector shows aFailed status in the Ditto Portal with the error message:
changeStreamPreAndPostImages enabled, or the setting was disabled after the connector was initially configured. The connector requires this setting on every synchronized collection so it can use change stream pre- and post-images to maintain causal consistency between Ditto and MongoDB.
How to verify the current setting:
Run the following command in the MongoDB shell to check whether the setting is enabled on your collection:
changeStreamPreAndPostImages.enabled. If it is false or missing, the setting needs to be enabled.
Resolution:
1
Run the Repeat this for each collection that the connector is configured to synchronize.
collMod command in the MongoDB shell to enable the setting:2
After enabling the setting in MongoDB, go to the Ditto Portal’s MongoDB Connector page and click Save (or delete and recreate the connector) to restart it.
Troubleshooting Schema Validation Errors
If your MongoDB collection uses JSON schema validation, documents synced from Ditto may fail validation and end up in the__ditto_unsynced_documents internal collection instead of the target collection.
Documents Rejected Due to Null Values
Symptom: Documents fail to sync from Ditto to MongoDB with a schema validation error. The__ditto_unsynced_documents collection contains the rejected documents.
Cause: Your MongoDB collection’s JSON schema validator defines fields with specific BSON types (e.g., string, date) but does not include null as an accepted type. When Ditto documents contain null values for fields that have not yet been populated — for example, a response field that remains null until a user interacts with it — MongoDB’s validator rejects the document.
Fix: Update your MongoDB collection’s schema validator to accept null alongside the expected type for any field that may contain null values. Use bsonType arrays to allow multiple types:
Troubleshooting Runtime Issues
The Troubleshooting Connectivity section above covers startup failures where the connector shows asFailed. This section covers a different scenario: the connector status shows Running in the Ditto Portal, but data has stopped syncing between MongoDB and Ditto.
Symptom
The connector reports a Running status in the Ditto Portal, but new changes made in MongoDB are no longer appearing in Ditto (or vice versa). Change stream event consumption may have dropped to zero.
Possible Causes
This can occur after internal infrastructure events on the Ditto cluster, such as:
- Pod restarts or rescheduling
- Certificate rotation events
- Cluster maintenance operations
- Confirm the connector status still shows
Runningin the Ditto Portal under Settings > MongoDB Connector. - Make a test change to a document in a synchronized MongoDB collection and verify whether it appears in Ditto within a few seconds.
- If the change does not appear, the connector is likely stuck and not consuming change stream events.
Running but data is not syncing, contact Ditto Support to investigate. The support team can inspect connector pod health, check for certificate or resource issues, and perform a pod restart if needed. No data loss occurs during a pod restart — the connector resumes processing from its last recorded change stream position.
This type of issue does not require reconfiguring or recreating the connector. A pod restart performed by Ditto Support is typically sufficient to restore normal operation.
Connector Stops Consuming Events After Infrastructure Changes
If the MongoDB Connector stops processing change events after an infrastructure change — such as a MongoDB cluster resize, scaling operation, or resource reallocation — the connector pod may have become unresponsive. Symptoms:- New documents written to MongoDB collections are not appearing in Ditto
- The MongoDB change stream event rate drops to zero
- The connector status in the Ditto Portal still shows as
Running
Reconfiguring the Connector
There are some cases where you may need to re-configure the connector, for example:- You need to add a new collection to the connector
- You need to remove a collection from the connector
- You need to change the ID mapping for a collection
- You need to change the credentials used by the connector
Edit button on the MongoDB Connector page in the Ditto Portal.
This will open a form with the current configuration, allowing you to modify the configuration as required:
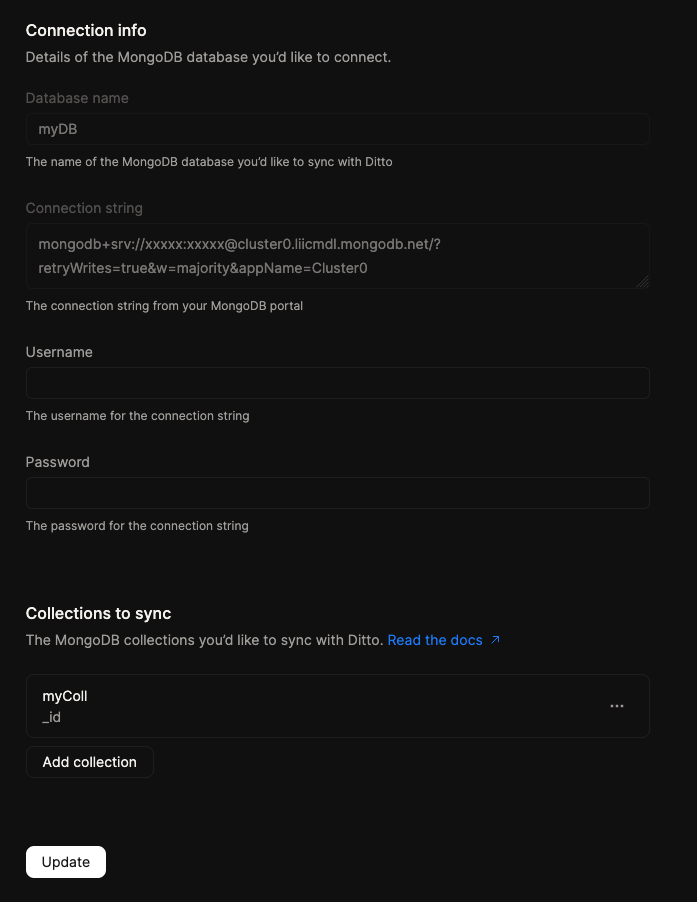
Save button to update the connector with the new configuration.
Behavior on Re-configuration
When you re-configure the connector, the connector will automatically take specific actions based on the changes you have made:- If adding a new collection, the connector will automatically trigger an initial sync of the collection from MongoDB to Ditto, if initial sync is enabled in the collection configuration.
- If changing the ID mapping for a collection, the connector will automatically trigger an initial sync of the collection from MongoDB to Ditto if enabled in the collection configuration. All documents imported during this initial sync will be using the new ID mapping, but existing documents in Ditto will not be updated, you will need to manually delete these old documents in Ditto if desired.
- If toggling initial sync on a collection, the connector will not automatically trigger an initial sync of the collection from MongoDB to Ditto, unless there are other changes to the collection configuration (e.g. ID mapping).
- If removing a collection, the connector will stop synchronizing the collection between MongoDB and Ditto. Existing documents in this Ditto collection will not be deleted; you will need to manually delete these documents in Ditto if desired.
- If changing the credentials used by the connector, the connector will automatically reconnect to MongoDB using the new credentials. No document changes will be missed as part of this rotation process.
Sync Direction
By default, the MongoDB Connector performs bidirectional sync — changes in Ditto propagate to MongoDB and vice versa. You can also configure the connector for unidirectional sync, limiting data flow to a single direction:- Ditto to MongoDB only: Changes made on Ditto devices sync to MongoDB, but changes made directly in MongoDB do not sync back to Ditto.
- MongoDB to Ditto only: Changes made in MongoDB sync to Ditto devices, but changes made on Ditto devices do not sync back to MongoDB.
Targeted Resync
Targeted resync allows you to resync specific documents from MongoDB to Ditto without running a full initial sync of an entire collection. This feature, introduced in Ditto Server v1.63.1, is useful when individual documents fail to sync or go missing due to connector outages, transient errors, or other issues.When to Use Targeted Resync
Use targeted resync when:- You notice specific documents that exist in MongoDB are missing from Ditto.
- A connector outage occurred and some documents may not have been picked up by MongoDB Change Streams during the downtime.
- Transient errors caused individual documents to fail synchronization, and you want to retry them without resyncing the entire collection.
Specifying Document IDs
When calling the targeted resync endpoint, you provide a list of document IDs via thedocument_ids parameter. Each ID must use the correct BSON type matching the _id field in your MongoDB collection.
The following example illustrates the correct and incorrect ways to specify document_ids for a collection that uses ObjectId as its _id type:
Correct — ObjectId values
Incorrect — plain strings (will match zero documents)
_id, then passing strings directly is correct.
Monitoring Resync Progress
You can monitor the progress of a targeted resync using the following Prometheus metrics:Internal Metadata
In order to provide consistency across the two systems, the connector uses some internal metadata. Specifically this metadata tracks:- Current MongoDB sessions, to avoid circular writes between the two systems. This is stored in the
__ditto_connector_sessionsinternal collection within your MongoDB database. These are periodically cleaned up by the connector when the sessions are no longer needed. - Documents that failed to synchronize from Ditto to MongoDB (for example they may have been rejected due to schema validation issues). These are stored in the
__ditto_unsynced_documentsinternal collection within your MongoDB database. These documents serve as a record for you to know which documents have failed to synchronize, and can be used to manually resync the documents. This collection is not automatically cleaned up by the connector, you can choose to delete the documents in this collection if you no longer need to keep track of these documents. - BSON field mappings for documents, currently stored as a metadata field (prefixed with
_within the Ditto document)
Monitoring Connector Health
You can use the connector’s internal metadata and your own application data to monitor the health of the synchronization process.Checking __ditto_unsynced_documents
Periodically query the __ditto_unsynced_documents collection in your MongoDB database to detect documents that failed to sync from Ditto to MongoDB. A growing number of records in this collection may indicate schema validation issues or connectivity problems that require investigation.
Comparing Document Counts
As a basic health check, compare document counts between your MongoDB collection and the corresponding Ditto collection. Significant discrepancies may indicate sync issues such as failed writes, dropped change events, or configuration problems.Using Timestamps
If your documents include anupdatedAt or similar timestamp field, compare recent timestamps between MongoDB and Ditto to verify that changes are propagating in both directions. A persistent lag in one direction can help you identify which side of the sync pipeline requires attention.